Kivy Window Management on X11

In the previous post we observed the kivy.core.window.Window object and discovered Window management from the Kivy API was quite limited. Since I am working on Linux, and that Linux conventionally use X11 as their window manager, I thought I'd take a look at the Python-Xlib module and see if we could control our Basic Application's geometry. And the good news is: it worked out fine :)

I've not looked into all details; working with X is new for me and I'm not familiar with conventions. Nevertheless, by peeking at some example code here and there on the net, I managed to get hold of our window and change its size.

First, you'll need Python Xlib, which you can get with:
sudo apt-get install python-xlib

Then make a module, which we call kivyXwm.py (for Kivy X Window Manager):
#!/usr/bin/env python
 
from Xlib.display import Display
from Xlib import X
 
def resize(title=str, height=int, width=int):
    TITLE = title
    HEIGHT = height
    WIDTH = width
   
    display = Display()
    root = display.screen().root
    windowIDs = root.get_full_property(display.intern_atom('_NET_CLIENT_LIST'), 
        X.AnyPropertyType).value
    for windowID in windowIDs:
        window = display.create_resource_object('window', windowID)
        title = window.get_wm_name()
        pid = window.get_full_property(display.intern_atom('_NET_WM_PID'), 
        X.AnyPropertyType)
        if TITLE in title:
            window.configure(width = WIDTH, height = HEIGHT)
            display.sync()

As I said, I am still a novice with X, but let me try to explain the big lines of the above code:
Line 9 & 10: we get the X display and the root window (which I understand is the main window, which is occupied by your desktop usually).
Line 11: get a list of all windows on the display. This list, however will only be known by their IDs, which is an int, so:
Line  12 to 16: we create an abstract object representing each window and find out if their title match our application's title.
Line 17 & 18: we change the height and width value of our window and we update the display.

Then we modify our Basic Application code like so:
#!/usr/bin/env python

import kivy
kivy.require('1.0.6')

from kivy.app import App
from kivy.uix.button import Button
from kivy.logger import Logger
import kivyXwm

class CoolApp(App):
    icon = 'custom-kivy-icon.png'
    title = 'Basic Application'
   
    def build(self):
        return Button(text='Hello World')
   
    def on_start(self):
        kivyXwm.resize(self.title, 100, 100)
        Logger.info('App: I\'m alive!')
   
    def on_stop(self):
        Logger.critical('App: Aaaargh I\'m dying!')

if __name__ in ('__android__', '__main__'):
    CoolApp().run()


Now in spite of the default size of your Kivy application (defined in the config file at ~/.kivy/config.ini), we set a new size for the application of 100x100. It's not a pretty thing to do, as you can see, although it's fast, it's a two-step procedure: first, Kivy makes a 600x800 window, then X changes its size to 100x100. Truly, it's a job for the GUI to set the Window size property. But this control through Xlib is good for other stuff, like setting the window "always on top" or "skip taskbar" parameters.
Xlib is able to pick up the application window from its title. I am still a bit confused here as to why title is a class attribute and not an instance attribute, but you have to pass self.title in the kivyXwm.resize() function. This may not be the best solution, I wonder what happens if we'd run two instances of the same application with the same title. Windows have their own IDs, but I'm not sure as to how to find the window we want from the list of windows X displays. I'll have to look for an alternative. The bad news is: Python Xlib is poorly documented, there is not even a docstring in the module :(

But that's one small victory, let's see what  more can be done next time!

Kivy: Tight Mac OS X Integration

I am very happy that I am allowed to participate in yet another Google Summer of Code in 2011. This will be my fourth consecutive and probably last GSoC – at least as a student. I am participating on behalf of the Kivy project for the second time now and my objective is to improve the integration of Kivy on Mac OS X. Let me explain what that means: In order for Kivy to function with its full set of features, which includes things like audio and video playback, window creation with OpenGL content, image display, spelling correction and more, we need to make use of some external software libraries that are dedicated to handle the respective tasks, such as video decoding, etc. Implementing a cross-platform video decoder for example is much work and beyond the scope of our project, which is why we use the work of other brilliant minds instead of reinventing the wheel. That said, there are a lot of different implementations for the kind of things we require. Since our goal is not to restrict the user to a certain set of those solutions, we abstract from those third party APIs and provide the necessary functionality through a common interface; both cross-platform and cross-API. This approach also enables us to more easily port Kivy to new platforms, such as Android, as we don’t have to modify the code that is using the abstractions, but just add a new implementation (which we refer to as a ‘provider’) for the new platform. Taking video as an example, we currently rely on gstreamer for the implementation. While gstreamer has proven to be a good choice on Linux (as it’s often included in Gnome based distributions anyway) it’s not an ideal choice from my point of view for other platforms like Mac OS X. This is because it adds additional packaging and maintenance overhead and also significantly increases the size of the Kivy distribution, as we have to compile and ship gstreamer with Kivy for the Mac (which is not easy anyway) because it doesn’t exist there by default. This is especially true because there is a native API to do the same things you’d use gstreamer for on the Mac. That API is always available on the Mac and using it would mean that we can still provide video playback support without shipping gstreamer. In fact, this is not only true for video, but for all of Kivy’s so-called ‘core providers’. Long story short, the goal of this GSoC is to use as many native Mac APIs (as is reasonable) instead of external libraries. Here is a list of Kivy’s core providers:
  • Window
  • OpenGL
  • Image
  • Text
  • Audio
  • Video
  • Spelling
  • Clipboard
  • Camera
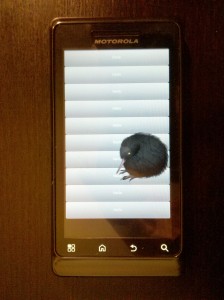
OpenGL already works and so does Spelling because I had already taken care of those previously. The first things I tackled during this GSoC were the window and image providers. Obviously you need a window to display the other things and have some feedback while developing, so this was a pretty obvious starting point. The original plan was to base the new window provider on Cocoa’s APIs directly, but while looking into that Mathieu pointed out that it might be preferable at the start to base it on the development version of SDL instead (which is also what pygame uses) as they already have this abstraction for every platform under the sun, so other platforms might benefit as well. Also, SDL is pretty easy to compile and package. So after some hacking, what do we have right now? There is a working SDL window provider. You can use it to open a Window and display OpenGL content. Still missing is handling of certain SDL events such as proper mouse/touch integration. Wile you can already draw a line with it, it’s not finished the way it should be yet. That is a TODO item. Next up was the image provider. Why? Simply because Kivy loads a default texture for use in its GL operations, so we figured instead of patching that out temporarily I might as well implement the image provider directly. So what we have right now is a working image provider based on CoreGraphics that should be able to handle all image formats that the CG APIs natively handle. There are only two things missing. Firstly it doesn’t seem to be handling alpha channels properly yet and secondly it currently reports a fake list of supported formats. These are TODO items. After finishing what I pointed out before, next up would be text and video providers. Starting tomorrow (May 30th) I will be in the US for a couple of days to visit the university where I’ll hopefully be doing my Master’s thesis. Unfortunately I had to sign a form that I will not engage in any GSoC related coding activities while I am in the US (you have to do that if you’re non-US based), so my next report will have to be a little delayed. This is what it currently looks like with the pictures example: Kivy on OS X via SDL and CoreGraphics The code is available here and right now very much work in progress.

The App() Class and its Window


The previous post looked into installing Kivy and running a simple button-application. This post will look closer at the App() class and its window to see what more can be done with them. NB: in this post and hereafter, all text between quotes "like this" will be drawn from the Kivy API Documentation. Usually I will link to the section it was quoted from." Also this post originally meant to look at the App() class and at the Button() widget class. After consideration I prefer to focus on the Window() class rather than Button().


Review the Basic Application's Code


First we are going to review the Basic Application's code:
import kivy
kivy.require('1.0.6')

from kivy.app import App
from kivy.uix.button import Button

class MyApp(App):
def build(self):
return Button(text='Hello World')

if __name__ in ('__android__', '__main__'):
MyApp().run()
Line 1: import Kivy (nothing too hard)
Line 2: specify the version of Kivy required for this program to function. "If a user attempts to run your application with a version of Kivy that is older than the version you specified, an Exception will be raised." You can find out the version you are currently using by merely importing Kivy from a Python Console, which will return an [INFO] log with the current version of Kivy, alternatively you can use kivy.__version__ .
Line 4 & 5: we import the bits and pieces we need. Although it's more work to do so, loading the entire library like from kivy import * "would have the disadvantage of cluttering your namespace and making the start of the application potentially much slower. It’s also not as clear what your application uses. The way we do it is faster and cleaner" (see documentation).
Line 7 & 12: the MyApp() class is derived from the App() class of the kivy.app repository. "The App() class is the base for creating Kivy applications. Think of it as your main entry point into the Kivy run loop. In most cases, you subclass this class and make your own app. You create an instance of your specific App() class and then, when you are ready to start the application’s life cycle, you call your instance’s App().run() method" as in line 12 here.
Line 8 & 9: the build() method "initializes the application [and] returns a widget [that] will be used as [root] and added to the window." This method needs not be called, the App().run() will do that for us. In this instance, the build() method returns a Button() widget with a "Hello World" text (label) displayed on it. We'll look at the button() class with more details in a moment, for now let's look at what other things the App() can do.


More on the App() Class


If we look at the documentation on the App() class, we'll find various methods and properties which we can use, some of these methods are automated, as of now I cannot imagine a situation when one would need to call these oneself. This is the case of the build()method, which, as we have seen, will run itself  when calling App().run(). It is also the case of the load_kv() method which will be called as the application is launched with App().run(). The load_kv() method will load a .kv file, of which more later.
The App() class offers two attributes called icon and title. The first is a string referring to the relative path+name of the icon file which will be displayed in the task-bar or dock of your OS.
In our MyApp() class definition, which is derived from the bas App() class, we then can modify the default icon property. The default icon tends to render awfully in my dock (I use Cairo-Dock by the way, it's really cool), so I made my own Kivy icon with Inkscape. Now in our class definition we can add the following:
class MyApp():
    icon = 'custom-kivy-icon.png'
While doing this I figured out from the log that Kivy does not support SVG format for the App.icon property, PNG worked fine.
Next we want to change the title property. I was wondering why my application was called "My" by default (look at the title bar when launching the application) and I soon figured out that Kivy is sensitive to the spelling of some of its objects and it naturally derived the application's title from the MyApp() class definition by removing the -App suffix. This makes more sense as one discovers that Kivy does a lot of the job for you, by associating the App() class with its .kv file for instance. Now if we change line 7 and 12 to CoolApp() and CoolApp().run() respectively, the title of our application will change to "Cool". That new title however, will be overridden by whatever string will be passed in the App.title so if we add title = 'Basic Application' to the line following our icon property and run the application again, the title should change accordingly.
Furthermore there is the on_start() and on_stop() methods which will be called when the application will be launched and halted, by the one_start and on_stop events respectively. So for instance we could use a simple print function to print something to the console as we launch the application. But Kivy developers wisely introduced a Logger to the library, which logs and prints all kind of information on the console, it's pretty cool for debugging and it's nice to simply know what's happening inside the box. The Logger not only prints to the console but also writes the stuff that goes through it to a log text file in your ~/.kivy folder so you can still access the log even if you closed the terminal. To add a log, we simply need to add a line where/when we need the message to be logged, check the documentation for proper syntax.
Now we've omitted the App().stop() method, but we'll see that one in the next section, together with the Button widget.
The code, now updated should look like this:

#!/usr/lib/python

import kivy
kivy.require('1.0.6')

from kivy.app import App
from kivy.uix.button import Button
from kivy.logger import Logger

class CoolApp(App):
icon = 'custom-kivy-icon.png'
title = 'Basic Application'

def build(self):
return Button(text='Hello World')

def on_start(self):
Logger.info('App: I\'m alive!')
 
def on_stop(self):
Logger.critical('App: Aaaargh I\'m dying!')
 
if __name__ in ('__android__', '__main__'):
CoolApp().run()


The Application's Window


At this point I originally thought I'd focus on the Button() widget class and see what could be done with it. But I got confused by the fact that the Button() is the root object returned by App().build() in the example here above. For instance I found that 600x800 px was quite a size for a single button, so I thought I could resize it with Button().size = int, but that didn't work, because the root object returned by the build() method will take on the entire window's space.
But where is this window then in our code? Well, it seems that Kivy does make the work easy for us, in comparison to some other GUI libraries to which every single action must be instructed by the developer.
Let's try a small experiment: if you import time and add time.sleep(2) in your on_start() callback, then run your application, you will see that the application's black window appears first and then the button is drawn onto it. Now we have seen this window on the screen, let's find it in the code.
If we look at the run() method in the app.py code, we see that the method will first get the widget tree and then append it to a Window() instance imported from kivy.core.window. In the documentation, you will find more about this Window() class, and I wanted to look at it closer before I turn to the content of my application. Let's parse it together.
Right at the outset of the documentation we are warned: "Kivy support only one window creation. Don’t try to create more than one". To me this begs the question: what if I want my application to have more than one window? I'm thinking of an application like the Gimp for instance, which has its Toolbox in a separate window from that of the drawing. I haven't tried yet, but I guess that one would need to create two instances of the App() class.
I was concerned about the size of my application, and we find the parameters listed in the documentation fullscreen, height and width, but using them in our App() class won't work because the App().run() method doesn't let us pass size parameters. There are then three ways to customise the Window() size of our application:
  1. change the configuration file's height and width values (or fullscreen values)
  2. change the same configuration file from code
  3. launch our application with a --size=WxH tag where W and H are width and height in pixels.
Of the three options I concluded the third was the best. Why? Because the configuration file, which is placed at ~/.kivy/config.ini is shared by all Kivy applications, and the parameters generated by our application would affect that of another application. I am not sure of what the practical use of these parameters are to be honest. The third option, on the contrary, is friendlier because it is passed along as a parameter for our Window() object to feed on. This means we should launch our application using the Terminal:
$ python ./main.py --size=100x50

Now if we want some form of control on the size of our application, we'll have to launch our Kivy GUI from code like this:
import subprocess
subprocess.Popen(['pathtogui', 'main.py', '--size=100x50'], shell=True)

... which is  not very handy and being able to pass the window geometry directly into the App() for instance or set its size as a property. However, I haven't found parameters to allow or prevent resizing of the window or set the minimum or maximum window size parameters. There may be a way though, since the Window() class of Kivy is derived from PyGame's. I'll look into that.
Positioning the window on the screen is possible through the configuration file only: set the position parameter to custom and the top and / or left values to the coordinate in pixels where you want the top-left corner of the window to be. Again, be careful while using the configuration file since it is shared by all Kivy applications.
To prevent window decoration from within Kivy's API, is possible through the configuration file and flags. Flags again are preferable since they affect the application's instance only. To prevent decoration can set the flag -k (i.e. 'fake fullscreen'). When the window is undecorated, it cannot me moved or resized with the mouse.
The window background can be changed with the Window().clearcolor property to which colour information should be passed in a tuple containing (r, g, b, a) information. Although I managed to change the background colour of the window, setting alpha to 0 did not make the window transparent as I had expected.
Although I am quite enthusiast about Kivy, I feel quite disappointed by its window management at API level. This is because Kivy was developed for touch-phones in first instance, from what I understood. From the point of view of desktop GUI development however, I want to be able to place my window where I want, with the default, min and max size I want and I want it to be able to talk to the Window Manager (skip the window manager, provide window hints (to tell if the window is a dock or pop-up or splash screen), stay on top or below, sticky, reserved space etc.)
I am looking forward to make a dock/panel-like application, for which such features are indispensable. Perhaps there are work-arounds for that, and Kivy may still offer such features in the future, and I've already been told these features should be considered for further development :)
Basic Application

Alright, there's one thing you need to know about me: I'm quite stupid :) So I will start from the start and  play around with Kivy using basics and build up on that. NB: this post may be a bit redundant, Kivy offers a Quickstart already, from which I draw most of the content of this post.

First you'll have to install the Kivy library, there is an installation guide for Ubuntu as well (that's what I use). I've had some problems with the graphic library, preventing some examples included in the library to function. This is due to a bug, but luckily there is a patch to solve the issue for now. The patch's installation is quite long, but it's worth it :)

Then we're ready to start coding. Kivy's Quickstart offers a simple example to run:


Now you should not have problem running this on your system. You could do that from your terminal by running $ python ./main.py in the folder where you saved your Python file. Personally, I use Geany for coding, so I can run it from there. and you should see something like this on your screen:
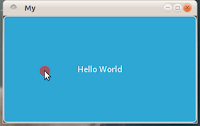
The window is a black canvas with a large grey button (with rounded corners). The window decoration is not part of the coding and is taken care of by your Window Manager. There may be a way to prevent this decoration by changing a property of the Kivy application, I am not sure of that just yet, but it could also be done by addressing the WM directly (by setting window decoration rules in Compiz for instance).
You can hover and click the button like this:
Now don't forget Kivy is made to function on touch-screen technology, there are three touch events: Down, Move, Up. From what I understand, touch events are passed in a top-down fashion, i.e. from the top-level parent widget, to the children. When the touch-event matches a listener of any of the widgets standing in the way of that event, they will launch their respective callbacks. Events are better explained in the documentation. Down and Up touch-events each match two default event listeners of the Button widget, namely on_press() and on_release(). The default callbacks of the Button widget affect its appearance: the background changes from grey to blue.

If your application does not shut down, you may be affected by the bug mentioned above. Next post will pick up from here and try to tweak this basic application and see what more can be done with App() and Button().


Using microphone peak as input

I’m currently on a project that involve disabled peoples, audio and kinect. Theses boys and girls are doing lot of loud sounds, so the idea is to use their sound as a trigger. We can use gstreamer to make that work quite easily, cause it have everything we need: a audio source, and level calculator.

import pygst
pygst.require('0.10')
import gst, gobject
gobject.threads_init()
 
pipeline = gst.parse_launch(
    'pulsesrc ! audioconvert ! '
    'audio/x-raw-int,channels=2,rate=44100,endianness=1234,'
    'width=32,depth=32,signed=(bool)True !'
    'level name=level interval=10000000 !'
    'fakesink')
 
level = pipeline.get_by_name('level')
bus = pipeline.get_bus()
bus.add_signal_watch()
 
def show_peak(bus, message):
    # filter only on level messages
    if message.src is not level:
        return
    if not message.structure.has_key('peak'):
        return
    # read peak
    print 'peak', message.structure['peak'][0]
 
# connect the callback
bus.connect('message', show_peak)
 
# start the pipeline
pipeline.set_state(gst.STATE_PLAYING)
 
ctx = gobject.gobject.main_context_default()
while ctx:
    ctx.iteration()

The output could be something like this :

peak -35.2370719856
peak -35.0252114393
peak -10.8591229158
peak -4.6007387433
peak -4.85102463679
peak -6.45292575653
peak -6.83102903668
peak -7.39486319074
peak -13.9852340247
peak -17.423901433
peak -35.0852178272
peak -35.8725208237

Next, we can use that information to record their sound, and use it on some scenario. So, instead of use the fakesink, we can use appsink. This module allow you to read the buffer pushed by the previous module. So we can put theses buffers into a list, and use them when needed :)

The state machine will handle the 3 phases :

  1. Wait for a peak > -30db
  2. Recording the sound, stop when the peak is < -32db
  3. Replay the last sound

Note: The -30 / -32 are taken from my tests. If you have more noise, you need to adjust theses triggers.

And here is the final example:

import pygst
pygst.require('0.10')
import gst, gobject
gobject.threads_init()
 
pipeline_play = None
pipeline = gst.parse_launch(
    'pulsesrc ! audioconvert ! '
    'audio/x-raw-int,channels=2,rate=44100,endianness=1234,'
    'width=32,depth=32,signed=(bool)True !'
    'level name=level interval=10000000 !'
    'appsink name=app emit-signals=True')
 
state = 'wait'
peak = -99
buffers = []
level = pipeline.get_by_name('level')
app = pipeline.get_by_name('app')
bus = pipeline.get_bus()
bus.add_signal_watch()
 
def show_peak(bus, message):
    global peak
    # filter only on level messages
    if message.src is not level:
        return
    if not message.structure.has_key('peak'):
        return
    # read peak
    peak = message.structure['peak'][0]
 
def enqueue_audio_buffer(app):
    buffers.append(str(app.emit('pull-buffer')))
 
def play_sample(sample):
    global pipeline_play
    with open('audio.dat', 'wb') as fd:
        fd.write(sample)
    if pipeline_play is None:
        pipeline_play = gst.parse_launch(
            'filesrc location=audio.dat !'
            'audio/x-raw-int,channels=2,rate=44100,endianness=1234,'
            'width=32,depth=32,signed=(bool)True !'
            'audioamplify amplification=2 ! autoaudiosink')
    pipeline_play.set_state(gst.STATE_NULL)
    pipeline_play.set_state(gst.STATE_PLAYING)
 
# connect the callback
bus.connect('message', show_peak)
app.connect('new-buffer', enqueue_audio_buffer)
 
# start the pipeline
pipeline.set_state(gst.STATE_PLAYING)
 
# main loop
ctx = gobject.gobject.main_context_default()
while ctx:
    ctx.iteration()
    print state, peak
 
    # wait for somebody to make a sound
    if state == 'wait':
        if peak > -30:
            state = 'record'
            continue
        # discard any buffer
        buffers = []
 
    # record the current audio, until the peak is going down
    elif state == 'record':
        if peak < -32:
            state = 'replay'
            continue
 
    # replay last sound
    elif state == 'replay':
        play_sample(''.join(buffers))
        state = 'wait'

Usage: Just make a sound… and it will replay just after.

Kivy on Android, part 2

Hi guys,

Look like people are following my blog and waiting for android version of Kivy.
We have a launcher that you can already use. Check the :

Maybe during the next release, or a little bit after, i’ll release a software to create an Android package of a Kivy application. The code is already on launchpad, but it’s still a work in progress. As soon as i have finished, i’ll publish it on kivy-dev mailing list. If you didn’t subscribe yet, do it now ! :)

More to come by the end of that week… !

Kivy (next PyMT) on Android, step 1 done !

Tonight is a wonderful night.

I know that i didn't announce Kivy officially yet, but i'll do it in another blog post very soon. You just need to know that Kivy is the next PyMT version. From 2 years ago with thomas, we have regulary doubts and reflections about using Python for PyMT. And i've started to look more at the future, and i was deeply convince that for our sake, we must be able to run on a Webbrowser. The goal is simple: same code for every platform, at least what we use every day: Linux / Windows / Macosx / Android / iOS.

Android and iOS are new OS, and we was thinking that except running in webbrowser, we will be never able to run on it. And we have started to target a futur with fewer dependencies, OpenGL ES 2.0 compatible, and so on. This vision have been named Kivy. Theses last days, i've removed numpy and pyopengl dependencies. Pygame is the only library required for running an application with widgets. (minimal don't mean full featured).

And i've started to look at the android platform, since Tom from Renpy library have deliver a pygame subset for android. He just made an awesome work. My part was just to understand how it work, and get Kivy compilation done.

For now, here is what i've got :

Ok, but what i got exactly ?

  • Python/Pygame running from renpytom project
  • Failed attempt to use numpy on android
  • Kivy adapation for android (opengl debug mode, removing numpy and pyopengl, link on opengl es 2.0...)
  • Pygame change to create OpenGL ES 2.0
  • Various patch on the build system

And here is my step 2 :

  • Send to upstream all the patch on the build system
  • Resolve symbol conflict when 2 compiled module have the same name (kivy.event and pygame.event... nice naming.)
  • Add a way of detecting Android platform from python
  • Add multitouch support to pygame and/or kivy
  • Add android sleep/wakeup in kivy
  • Write documentation about how to compile a kivy application on android

For now, sleep time ! Enjoy.