Texture compression, why does it matter ?

We all care about cash, time, life, love, and if you’re doing computer graphics, you might care about the memory consumption of your graphics card. Why ? For the same reason when you running out of cash :)

I’ll explain why does it matter to compress texture, and compare available possibilities. My personnal goal is to be able to load a lot of FULL HD pictures on tablet, for a museum project. The analysis is focused on DXT1 compression and size. I’m looking forward to ETC1 and will update that blog post with the result in the future.

What are we dealing with

If you are doing an application that display lot of hd pictures, that’s matter. We’ll start from this simple math statement: a full HD picture is 1980×1020 with 4 channels (RGBA). Whatever if your pictures is in PNG, or JPEG, your graphics card is not able to understand it, and will store it in its memory decompressed. So this image will eat:

1920 x 1080 x 4 = 8294400 bytes = 7.91MB
1920 x 1080 x 4 + mipmaps = 10769252 bytes = 10.27MB

In theory. Because it might be more if your graphics card doesn’t support NPOT texture. If not, usually, the texture will be resized to the closest POT texture available, mean for us: 2048 x 2048. Then the size for POT will be:

2048 x 2048 x 4 = 16777216 bytes = 16MB
2048 x 2048 x 4 + mipmaps = 22369620 bytes = 21MB

Compressions types

They are plenty types of compression availables. The most common are S3TC (including DXT1, DXT3, DXT5) from Savage3 originally, LATC from Nvidia, PVRTC from PowerVR, ETC1 from Ericsson…

Not all of them are available everywhere, and it’s depending a lot from your hardware. Here is a list of tablet / vendor / texture compression available. (only tablet, not desktop computer.) Thanks to this stackoverflow thread about supported OpenGL ES 2.0 extensions on Android devices

Tablette Vendor DXT1 S3TC LATC PVRTC ETC1 3DC ATC
(desktop computer) GeForce GTX 560 NVIDIA X X X
Motorola Xoom NVIDIA X X X X
Nexus One Qualcom X X X
Toshiba Folio NVIDIA X X X X
LGE Tablet NVIDIA X X X X
Galaxy Tab PowerVR X X
Acer Stream Qualcomm X X X
Desire Z Qualcomm X X X
Spica Samsumg X X
HTC Desire Qualcomm X X X
VegaTab NVIDIA X X X X
Nexus S PowerVR X X
HTC Desire HD Qualcomm X X X
HTC Legend Qualcomm X X X
Samsung Corby Qualcomm X X X
Droid 2 PowerVR X X
Galaxy S PowerVR X X
Milestone PowerVR X X

We are seeing that ETC1 is standard compression for OpenGL ES 2, unfortunately, it will not work on desktop.
PVRTC is specific to PowerVR device: it’s a standard on Ipad/Iphone.

Using DXT1

If you use DXT1, you need a POT image. DXT1 doesn’t work on NPOT.

To convert any image to DXT1 without any tool, you must know that your graphics card is capable of doing it, using specials opengl functions. But i wanted to precalculate them.
Nvidia texture tools contains tools for converting them, but you need an Nvidia card. For all others, you might want to look at Libsquish. It’s designed to compress in software a raw image to DXTn.
The result will be not a DXT1 “file”, because DXT1 is the compression format. The result will be stored in a DDS file, that we’ll see later about it.

If you want to be able to use libssquish in Python, you might want to apply my patch available on their issue tracker

For DXT1, the size of the file is not depending of the image content:

DXT1 2048x2048 RGBA = 2097152 bytes = 2MB

That’s already a big improvement. DXTn is able to store mipmaps of the texture too. For this size, the calculation is:

DXT1 2048x2048 RGBA + mipmap = 2795520 bytes = 2.73MB

Comparaison table

Type Resolution File size GPU size Images in a 256MB GPU Images in a 512MB GPU
Raw RGBA image (POT) 2048 x 2048 - 16384KB 16 32
PNG image (NPOT) 1920 x 1080 4373KB 8040KB 32 65
PNG Image in reduced POT resolution 1024 x 1024 1268KB 4096KB 64 128
DXT1 without mipmap 2048 x 2048 2048KB 2048KB 128 256
DXT1 without mipmap, reduced 1024 x 1024 512KB 512KB 512 1024
DXT1 with mipmap 2048 x 2048 2730KB 2730KB 96 192
DXT1 with mipmap, reduced 1024 x 1024 682KB 682KB 384 768

As soon as we use compression, what we see is:

  1. The file size is the same as GPU size
  2. Even with POT texture compared to NPOT dxt1, we can still store 4x more images in GPU

And with Kivy ?

DXT1 itself is the compression format, but you cannot actually use it like that. You need to store the result is a formatted file. DDS.

Kivy is already able to read DDS files. But you must ensure that your graphics card is supporting DXT1 or S3TC. Look at gl_has_capability() function in Kivy then.
Kivy: Tight Mac OS X Integration (GSoC Conclusion)

With this Google Summer of Code’s firm pencils down deadline approaching rapidly, I thought I’d write a status report for what is mostly going to be the ‘official’ result of my work. I won’t drop dead right after the deadline passes or this posting is published, but this is just one of the formalities I have to take care of, the sooner the better.

During the course of this Google Summer of Code, I’ve been extensively working on the OS X support of the Kivy framework. As I have explained previously, Kivy’s set of features is based on the concept of providers, meaning that every functionality required by the framework is encapsulated in a provider that defines an abstract interface to the user (i.e. developers) of the framework. Each such interface then has a number of specialized implementations using (in almost all cases) a third-party or system supplied software library that was designed to do work in the field that the respective provider operates in.

Now my task of this GSoC was titled “Tight Mac OS X Integration”, which means that we wanted to reduce the number of external libraries (not system libraries) that we were using in Kivy, as those have to be compiled for and bundled with our OS X executable. Not only does this add to the overall memory requirements (storage wise), it also requires extra steps to be taken when it comes to maintenance and deployment.

In concrete terms, during this GSoC I implemented the following providers:

  • Window (based on SDL; this was an internal decision tito and I made as this would be reusable on iOS as well)
  • Image (based on Apple’s Core Graphics and Quartz APIs; I actually provided two versions of this, see below)
  • Text (based on Apple’s Quartz APIs; I too provided two implementations for this)
  • Audio (based on Apple’s Cocoa APIs)
  • Video (based on Apple’s QTKit APIs)

Now for the image and text providers, I wrote two versions, respectively: One Python based version that uses PyObjC (available by default on OS X) and one ObjC based version to which I bridge using Cython. The advantage of the PyObjC versions are that they’re just single Python files that can be run on any recent Mac without inquiring any bundling or presence of additional tools, or even compile-link cycles. The drawback is that I cannot use them on iOS, as PyObjC is way too bloated for what I need, not well maintained and not functional on iOS anyway. That’s why I have a second version of those providers that actually works on iOS, as can be witnessed in my last blog posting. I will branch these off into the iOS support branch and bring them in back later into master when Kivy support for iOS is officially supported.

So what have we got now? Seven new provider implementations for 5 different core tasks. One of which (Window, SDL) will actually be reusable on all our supported platforms, not just OS X. The other four use native system APIs that already exist on any mac, so there is absolutely no memory footprint (storage wise) added and as soon as this hits master, we will see a dramatic reduction of size and bloat of the Kivy installer (and it will make my life as the OS X maintainer a whole lot easier). In numbers (and this is a back-of-the-envelope calculation), we’ll probably be reducing the size from 100 MB (uncompressed) to about 10 MB (uncompressed). They also benefit from the functionality that OS X inherently provides, such as audio and video codecs (the list of which can be added to by the user by installing things like Perian).

Since midterm, that means we’ve got audio and video providers, a new audio example, text and image PyObjC-based providers, significant visual improvements in terms of text rendering and under the hood changes for text and image display. This is a before/after shot for text rendering. There have also been some other artifacts around the characters that I’ve also gotten rid of. This and a couple fixes from tito now also make it work in the text input widget.

Here’s a video showing the video provider in action (The stutter comes from the screen capture. That video displays smoothly on my Mac).

This was the first time I’ve worked with Objective C or Apple’s APIs, so naturally a lot of work went into researching the different APIs, learning how Objective C works and how I can make use of it (I will write another posting to describe an alternative approach to using Objective C from Python that I came up with). I have a great sense of personal accomplishment in terms of teaching myself and therefore learning new things in this area and this is one of the major things I really like about Google’s Summer of Code project.

As a side note, I recently moved to the US for the remainder of the year to write my master’s thesis and I had to take care of a huge amount of (paper)work for that (this is kind of a pioneer project). So there’s some glitches remaining that I’ll certainly be looking into as soon as I get the time and then merge all of this new code into master and make it available to the user.

For instance, amongst other things, the text display isn’t a pixel perfect match with the other platforms yet and the video provider has problems with larger files that gstreamer handles properly (but at least it handles some other formats that gstreamer doesn’t, I just don’t want to break existing apps that rely on gstreamer supported formats to work at this point).

Anyway I’ll continue to dig into these remaining tasks before and after the deadline and I’d like to take a moment to thank a few people for what has been a terrific Google Summer of Code (probably my last as a student, unfortunately): Paweł Sołyga for being my mentor, Christian Moore for taking care this project could exist under the NUIGroup organisation umbrella and Mathieu Virbel for all the discussions and the help.

Pause

As excited as I am about using and discovering Kivy, current circumstances require me to let go of it and focus on my studies instead. So it may not be a while before I can post new stuff on this site again.
If any one feels like posting here however, just let me know and I add you as editor on this blog.
Cheers.

Python on iPhone & iPad

I recently had the opportunity to do some research with the goal of being able to run Python on any iOS device (iPhone, iPad, iPod touch). The idea is to only write some Python code (and nothing else) and deploy that to different platforms without changing it (e.g. Windows, Linux, Mac OS X, Android, iOS).

If you’re interested, here’s a preview/draft document that at a very high and easy to understand level very roughly summarizes what had to be done.

Now I’m not saying that this is THE way to develop cross-platform software, especially for devices such as tablets. The goal just was to see whether or not it’s technically possible and feasible to write applications for iOS using Python only. Fortunately, it seems possible and actually the programs run pretty snappy. They also use the GPU for rendering using OpenGL ES 2.0. Also, there was no jailbreak necessary.

Consider this work in progress. There’s still many things on the TODO list, I just wanted to share the early results with you and let you know that it is in fact possible. The code is on github and I’m using the kivy framework. I’m looking for opportunities to present this in much more depth in a journal or at a conference. If you know of any opportunities, please send me a mail (address in the PDF).

python on ipad python on ipad

Update: I mentioned the code to be on github, but didn’t provide any actual links as I was in a hurry when I wrote the blog post. Here are the links: Python for iOS repo (compiles Python 2.7 for ARM, based off of cobbal’s repo): https://github.com/dennda/python-for-iphone Kivy iOS support branch: https://github.com/tito/kivy/tree/ios-support Objective C test app that embeds Python and runs a Kivy example: https://github.com/dennda/python-for-iphone-test You will also need SDL 1.3.

And last but not least I’d like to repeat what I wrote in the PDF and thank my friend Mathieu Virbel (from the kivy team) for all the help. I especially enjoyed the hack session we had at UDS.

Kivy at EuroPython – Lightning explanation


For all the guys that was interested about Kivy lightning talk at EuroPython 2011, due to some incomprehension about what is Kivy, here is a lightning explanation to make it clear.

Kivy is a Python framework designed for creating of Natural Users Interfaces. The framework containing abstraction for loading image, video, audio. It have a complete new approach about input events, and widgets. For example, you can use lot of widgets at the _same_ time, something not really possible in classical framework (qt, gtk…): try to touch on a button while selecting something in a list. This is not only about multitouch for one user, but also for multi users. Kivy graphics engine is in OpenGL ES2, and all the widgets are using it.

If you write an application in top of Kivy, you can deploy it on Linux, MacOSX, Windows and Android. Without changing anything in your code. Because it’s in Python.

The presentation tool i’ve used is PreseMT. It have been made by Christopher and Me. And it’s an application built using Kivy. A version of this tool is already published on Android Market.
PreseMT have been written in one week, and use lot of Kivy features. But it’s still not finished, and we are missing lot of features, like the ability to export the presentation in a “good” format. We have plan to make an export in HTML5, that will support animation too.

Feel free to follow me on @mathieuvirbel !

Recording OpenGL output to H264 video

Apitrace is a tool for recording all the gl commands in a trace file. The trace file can be replay in later time, and they got a nice gui for checking all the gl call every frame, with introspection. They have a glretrace software that replay a trace file. We can use it to get the output of everyframe and push it in a gstreamer pipeline to make a video.

Why not using gtkRecordMyDesktop or other screen capture ? Sometime, the overhead of capturing and encoding video on live take too much CPU. And the application start to slow down. I didn’t see any slowdown using apitrace, and the trace file is very small compared to video output or raw video output.

So first, compile apitrace with stdout support:

$ git clone git://github.com/tito/apitrace.git
$ cd apitrace
$ git checkout snapshot-stdout
$ mkdir build
$ cd build
$ cmake ..
$ make

Take any opengl application, and make a trace file. The trace file will have the name of the binary. In my case, python is an alias to python2.7: the trace file will be python2.7.trace.

$ LD_PRELOAD=./glxtrace.so python ~/code/kivy/examples/demo/pictures/main.py
# replay for fun now
$ ./glretrace python2.7.trace

To be able to make a video from the trace file, you need to know the size of the window, and the initial framerate. Here, my example is running at 800×600, 60fps:

$ ./glretrace -sr python2.7-trace | \
  gst-launch fdsrc ! \
  videoparse width=800 height=600 format=rgbx framerate=60 ! \
  videoflip method=5 ! videorate ! ffmpegcolorspace ! \
  video/x-raw-yuv,width=800,height=600,framerate=\(fraction\)30/1 \
   x264enc pass=quant ! avimux ! filesink location=output.avi

The final video will be saved in output.avi. You can check the video output here :

If you like my work, tip me!

Designing Configuration and Settings UI for Kivy

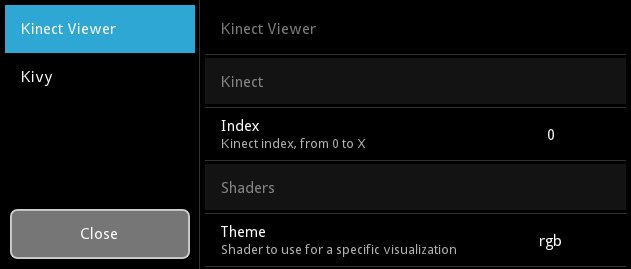
From 3 weeks now, i’m working on packaging kivy application, to create a installer/bundle/deb of a Kivy application. The reason is simple: as soon as you are doing an application, the user should not care about installing Kivy itself. In the same time, i’ve work on other projects that require to have their own configuration. From a long time, we always wanted to have some in-app settings for configure Kivy. Even Android have a “settings” button, we wanted to use it. :)

This is now possible.

Yes, it look like the honeycomb settings panel. Kind of. Well.

The configuration is automatically handled by the App class, and you can put your own token on it. The settings UI (that you’re seeing on the screen) is created from a JSON definitions. You can press F1 or the settings key on android to bring the settings panel, hook the on_config_change to know when a configuration token is changed from the settings ui, etc.

This is available in master, and will be published on next 1.0.7 version. If you are interested, please read and give feedback about the App documentation and the Settings documentation.

If you like my work, tip me!

NPOT textures support in OpenGL

If you already done OpenGL development, you should be aware of POT (Power of two) texture. Because of very old conventions, the texture size must be a power of two size. Not necessarily the same for width and height though : 256×256 is valid as 128×512.

The usual thing to do when you want to load an NPOT texture (like 23×61) is to:

  • take his closed POT size: 32×64
  • depending of the book you’re reading: blit/strech the 23×61 to the 32×64 texture
  • OR blit without stretch, and adjust texture coordinate (this is what kivy does right now.)

The downside part of this approach is that you’re lost a part of memory. Bad.

While ago, i remember to found the Rectangle texture support from NVidia. Aaah, finally, is it what we was waiting from a long time ? Erm, no. Their implementation have lot of downsides:

  • The usage of a specific texture target: GL_TEXTURE_RECTANGLE_NV
  • No mipmap support
  • The texture coordinates are not normalized from 0-1… but from 0-width/height of the image
  • Some wrap mode are not supported (GL_REPEAT for eg.)

But today… i discover that most graphics card are supporting rectangle texture. If the extension GL_ARB_texture_non_power_of_two (OES_texture_npot for OpenGL ES platform), you can finally ensure that loading NPOT texture will… just work as expected :

  • You can still use GL_TEXTURE_2D
  • Mipmapping are supported
  • Texture coordinates are from 0-1
  • All wrap mode are supported

A little note here, in OpenGL ES 2, they have a native support for NPOT texture, but with somes limitations related to mipmapping.

If you want to just load NPOT texture safely without using rectangle texture, just check the availability of theses extensions :

extensions = glGetString(GL_EXTENSIONS).split()
npot_support = ('OES_texture_npot' in extensions or \
                'GL_ARB_texture_non_power_of_two' in extensions)

Kivy Window Management on X11

In the previous post we observed the kivy.core.window.Window object and discovered Window management from the Kivy API was quite limited. Since I am working on Linux, and that Linux conventionally use X11 as their window manager, I thought I'd take a look at the Python-Xlib module and see if we could control our Basic Application's geometry. And the good news is: it worked out fine :)

I've not looked into all details; working with X is new for me and I'm not familiar with conventions. Nevertheless, by peeking at some example code here and there on the net, I managed to get hold of our window and change its size.

First, you'll need Python Xlib, which you can get with:
sudo apt-get install python-xlib

Then make a module, which we call kivyXwm.py (for Kivy X Window Manager):
#!/usr/bin/env python
 
from Xlib.display import Display
from Xlib import X
 
def resize(title=str, height=int, width=int):
    TITLE = title
    HEIGHT = height
    WIDTH = width
   
    display = Display()
    root = display.screen().root
    windowIDs = root.get_full_property(display.intern_atom('_NET_CLIENT_LIST'), 
        X.AnyPropertyType).value
    for windowID in windowIDs:
        window = display.create_resource_object('window', windowID)
        title = window.get_wm_name()
        pid = window.get_full_property(display.intern_atom('_NET_WM_PID'), 
        X.AnyPropertyType)
        if TITLE in title:
            window.configure(width = WIDTH, height = HEIGHT)
            display.sync()

As I said, I am still a novice with X, but let me try to explain the big lines of the above code:
Line 9 & 10: we get the X display and the root window (which I understand is the main window, which is occupied by your desktop usually).
Line 11: get a list of all windows on the display. This list, however will only be known by their IDs, which is an int, so:
Line  12 to 16: we create an abstract object representing each window and find out if their title match our application's title.
Line 17 & 18: we change the height and width value of our window and we update the display.

Then we modify our Basic Application code like so:
#!/usr/bin/env python

import kivy
kivy.require('1.0.6')

from kivy.app import App
from kivy.uix.button import Button
from kivy.logger import Logger
import kivyXwm

class CoolApp(App):
    icon = 'custom-kivy-icon.png'
    title = 'Basic Application'
   
    def build(self):
        return Button(text='Hello World')
   
    def on_start(self):
        kivyXwm.resize(self.title, 100, 100)
        Logger.info('App: I\'m alive!')
   
    def on_stop(self):
        Logger.critical('App: Aaaargh I\'m dying!')

if __name__ in ('__android__', '__main__'):
    CoolApp().run()


Now in spite of the default size of your Kivy application (defined in the config file at ~/.kivy/config.ini), we set a new size for the application of 100x100. It's not a pretty thing to do, as you can see, although it's fast, it's a two-step procedure: first, Kivy makes a 600x800 window, then X changes its size to 100x100. Truly, it's a job for the GUI to set the Window size property. But this control through Xlib is good for other stuff, like setting the window "always on top" or "skip taskbar" parameters.
Xlib is able to pick up the application window from its title. I am still a bit confused here as to why title is a class attribute and not an instance attribute, but you have to pass self.title in the kivyXwm.resize() function. This may not be the best solution, I wonder what happens if we'd run two instances of the same application with the same title. Windows have their own IDs, but I'm not sure as to how to find the window we want from the list of windows X displays. I'll have to look for an alternative. The bad news is: Python Xlib is poorly documented, there is not even a docstring in the module :(

But that's one small victory, let's see what  more can be done next time!