This ZDNet article was published a few days ago about how “Python apps might soon be running on Android”. It summarises some recent developments in Android support for CPython, but disappointingly it’s highly misleading about some key points. In particular the article states that “apps written in Python may one day run natively on iOS and Android devices”, but in fact people have been doing this since at least 2011.
I thought I’d write some short details about the actual history of Python on Android from my own perspective. It’s something I’ve been involved in on some level for about 8 years, and for a significant part of that I’ve been a primary maintainer of python-for-android. This is a build tool for creating APKs from Python applications, originally created for Kivy but now more generic so that it can also support e.g. flask running on the device with a webview gui, or more recently Pygame via its upcoming SDL2 support.
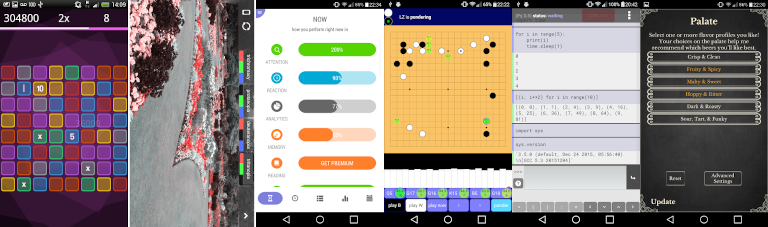
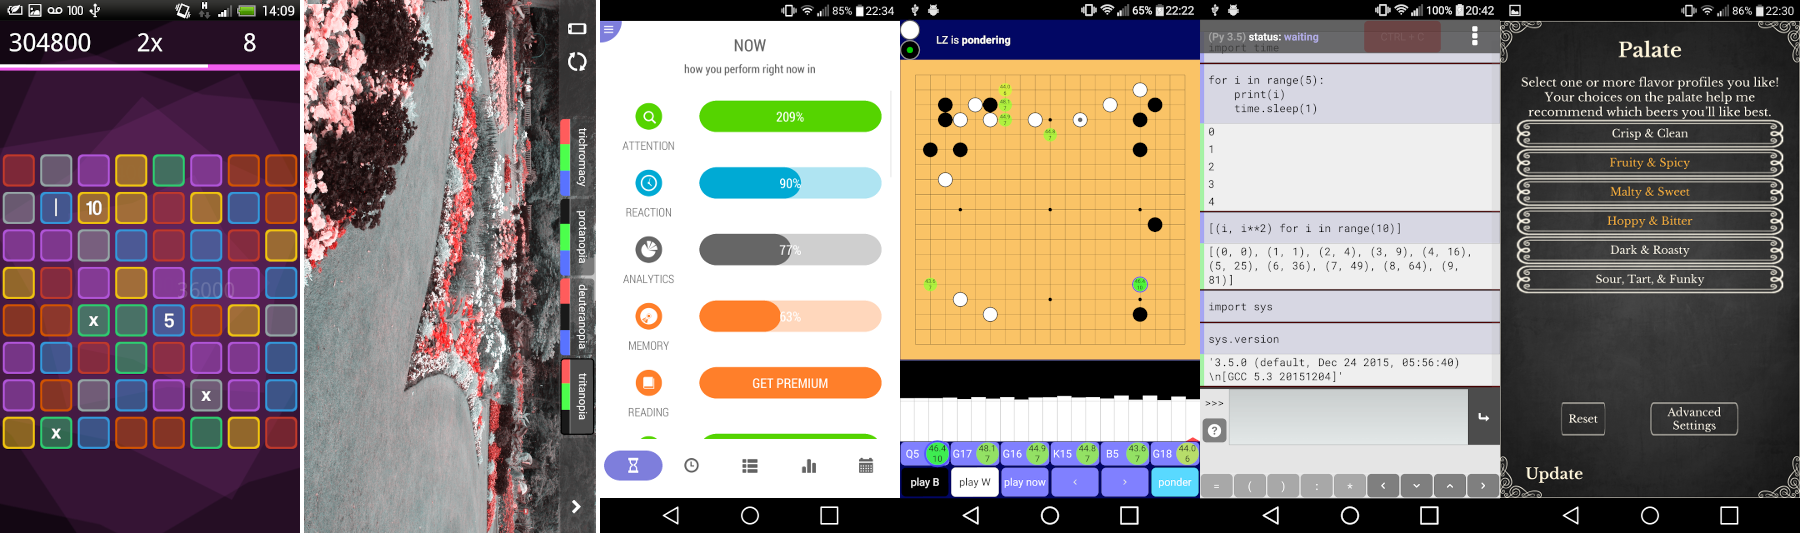
Example Python apps for Android. Large version. From left to right: Flat Jewels, ColourBlind, Kognitivo, Lazy Baduk, Pyonic interpreter, Barly (original Python version).
Notes on the term “native”
A key problem point around discussing Python on Android in that the term “native” is overloaded to mean two different things.
The first refers to simply compiling CPython to run “natively” with the Android kernel and libraries, just as it does on desktop platforms, and this is what the ZDNet article refers to with e.g. the quote “Android devices are now fast enough, and the Android kernel permissive enough, to run CPython itself”. This is not a recent development, it has been technically possible for many years, although the article is correct that it comes with disadvantages and not everything works the same as on desktop.
The second is using the “native” GUI toolkit for the platform. On Android that means using the same widget toolkit as normal Java-based development. This is the part that is difficult and not yet widely supported, see below for more discussion about the recent developments. I’m actually not sure if the ZDNet article intends to focus on this, but perhaps fails because the author doesn’t understand the distinction, certainly the article focuses on CPython technical details.
It’s absolutely true that having Python applications seamlessly using the native GUI toolkit is essential to making Python a serious alternative to Java for generic Android development. However, there are huge areas of Python development where this simply isn’t a big concern, e.g. everything from games (Pygame, Kivy, Renpy), to scientific visualisation (matplotlib, Vispy, other toolkits), to novel user interfaces (Jupyter notebooks or other apps that don’t care about the native GUI toolkit for whatever reason). All of these things are tremendously popular on the desktop without using the native GUI toolkit, because that detail is either irrelevant or specifically at odds with what they want to do.
History of Python for Android projects
The following projects are ones I remember as interesting and historically important in terms of creating Python applications on Android, in rough date order. This list undoubtedly isn’t complete and is strongly based on events as I remember them, I might have missed other important projects and I’m certainly missing details from before about 2012! I’ve also focused on application build tools, not the many individual patches and Python contributions that made them possible.
Pygame Subset for Android (PGS4A)
Pygame gained rudimentary Android support fairly early in Android’s history. I’m not sure exactly what happened when, but this old release announcement is from February 2011 and isn’t the first version.
PGS4A worked by compiling CPython for Android, with a modified version of SDL (the gui library that Pygame uses), and some Java code to get the app to start and display a surface that pygame could draw to. I believe there were some limitations to what you could do (there’s a reason it was a “subset” of Pygame), but I’m not sure what these were.
I remember people were actively using PGS4A around 2012 when I started looking at it myself, but its popularity slowly diminished over time, probably due to lack of developer support combined with its limitations.
Renpy
Ren’Py is a visual novel engine with great cross-platform support. Actually, I suspect it’s quietly one of the most successful Python game engine projects, e.g. you can find quite a few Renpy-made games available via Steam.
Renpy gained Android support a long time ago, maybe in 2011 or earlier. I believe that as with PGS4A, it worked by combining pygame with a modified version of SDL and some custom Java code to display an app surface that Renpy could draw to. I’m not sure if the Renpy build tools actually had history in common with PGS4A, but I don’t think they were the same project at any point I remember.
Renpy’s Android support hasn’t been static, it’s evolved since 2011. At some point around 2014-2015 it switched to use a fork of Pygame using SDL2, with corresponding updates to the Android build process. This makes sense because SDL2 itself supports Android properly, removing a huge maintenance burden. Note that this pygame_sdl2 project is not the same as the SDL2 support currently under development from the core Pygame team, I don’t think Renpy’s pygame_sdl2 is in wide use and I don’t know what its limitations are.
Kivy and python-for-android
Kivy is easily the most well known Android-supporting Python toolkit I’m aware of, and has been since around 2012 when I came across it myself after failing to get a Java Android tutorial working. Kivy is a graphical toolkit that was not specifically designed for mobile support, but instead focused on being generically cross-platform and supporting novel user interfaces. This turned out very timely, as these properties made it very well suited for Android and iOS support, although Kivy also supports desktop use. Kivy draws its GUI using OpenGL, which has the advantage of working essentially the same on all different platforms, but this can also be a disadvantage in that it means not using the native GUI toolkit as discussed above.
My understanding is that Kivy’s Android support was originally based on Renpy’s Android build tools, which through some amount of collaboration and changes from different places ended up being the genesis for Kivy’s python-for-android project, first commit November 2011. Renpy’s Android build project then shifted to use a fork of python-for-android at some point, after which the projects have been developed separately.
Python-for-android was originally quite Kivy-specific, but was totally rewritten in 2015 to be a more generic and modular build tool, coinciding with Kivy’s own transition to SDL2 as a default backend (in fact this is where I really got involved). Since then its breadth of support has increased dramatically.
Beeware
BeeWare is a collection of tools and libraries for building Python applications across different platforms, both desktop and mobile. These projects have a particular focus on manipulating the native graphical toolkits of a given platform, e.g. on Android they want to use the same “native” GUI widgets as a normal Java-built application. Its toga toolkit provides a platform-independent GUI abstraction for this, in combination with platform-specific toolkits for each individual target.
I believe the BeeWare developers (or at least the core developer Russell Keith-Magee) did some initial experimentation using CPython on Android somewhere around 2015. The idea there would be to create and manipulate the normal Java-native GUI widgets using Java Native Interface (JNI). This is actually possible, it’s something we also support in Kivy and is occasionally useful to e.g. display a webview. Unfortunately it has some key disadvantages including that Python is still quite slow to start, and in particular that Android used to enforce a fairly low limit on the number of JNI references that could be simultaneously maintained, which makes building a full GUI impractical. My understanding is that a combination of these factors made CPython use impractical for Beeware on Android.
BeeWare instead switched to creating VOC, a Python code to Java bytecode transpiler. This converts the Python input into genuine Java bytecode that can run as a normal app without the above limitations. I haven’t tried this for some time, but I understand it works fine. However, it seems the difficulty of supporting the full breadth of Python libraries has been a barrier (at least, that’s been my impression from watching discussions about it, I think it’s still under active development and working well).
Fortunately Android itself has improved, and in particular the limitation on JNI references is no longer present in recent versions. In 2019 BeeWare switched back to targeting CPython on Android, supported by a PSF grant. It is the outcome of this grant that led to the discussions and article I linked at the top. See the end of this post for a brief summary.
Chaquopy
Chaquopy provides build tools for both including Python code in Java applications, and building apps entirely in Python. I’m not sure about the technical details, but I’ve been consistently aware of it as an active project since about 2017, so it may be useful to anyone interested in this sort of thing. I guess there must be some overlap with what python-for-android does, but Chaquopy’s integration of Python and Java code seems to be more of a focus.
pyqtdeploy
The popular Qt graphical framework supports Android. Python bindings to this framework are quite popular, so it’s not a huge surprise that there’s some level of Python for Android support using Qt for the GUI. As far as I’m aware pyqtdeploy is the primary build tool for this, using the PyQt bindings, but I may not be up to date about it. I’ve never seen this to be very popular, but I don’t know if there’s a reason for this beyond its relative obscurity.
What are actually the recent developments in CPython on Android?
Various contributors have driven improvements in CPython’s Android support over the years. I would give more details but honestly I’ve never found the time to get deeply involved so the historical summary is limited by my own ignorance! This has brought CPython to the point of being fairly easy to compile for Android as of about version 3.6. For instance, python-for-android’s CPython build recipe applies no essential patches to the Python 3 source, just an appropriate set of build arguments.
The key recent development is the BeeWare project’s switch to CPython explained above. They’ve made a specific goal of understanding where CPython’s Android support can be improved, and getting involved to resolve these problems. This means attacking both individual technical issues (e.g. getting Python’s test suit passing correctly), and longer-term structural problems (e.g. the suggestion described in the ZDNet article to create a stripped-back Python kernel for mobile use).
These recent developments are great, and hopefully will lead to huge improvements in the ease of deploying Python applications for Android, especially addressing the missing functionality of using the native Java GUI toolkit. However, let’s not forget the history of CPython on Android, people have been creating applications for both business and pleasure for many years.

