This is number 7 in a series of introductory Kivy tutorials.
Central themes: kv language, building a gui, integration with Python
The goal of this tutorial will be to build up a simple gui around the DrawingWidget built in the last two tutorials. A nice simple goal would be to let the user select the colour of the lines. Kivy actually has a ColorPicker Widget for this purpose (see the documentation), but we’ll skip that for now in order to continue demonstrating Kivy widget construction.
Note: Since all Kivy widgets are built out of other Widgets and canvas instructions, you might like to think about how you’d build the ColorPicker from scratch.
Let’s start with the code from last time, minus the now-unnecessary red Rectangle:
from kivy.app import App
from kivy.uix.boxlayout import BoxLayout
from kivy.uix.slider import Slider

from kivy.uix.widget import Widget
from kivy.graphics import Rectangle, Color, Line

from random import random

class DrawingWidget(Widget):
    def __init__(self):
        super(DrawingWidget, self).__init__()

        with self.canvas:
            Color(1, 1, 1, 1)
            self.rect = Rectangle(size=self.size,
                                  pos=self.pos)
        self.bind(pos=self.update_rectangle,
                  size=self.update_rectangle)


    def update_rectangle(self, instance, value):
        self.rect.pos = self.pos
        self.rect.size = self.size

    def on_touch_down(self, touch):
        super(DrawingWidget, self).on_touch_down(touch)

        with self.canvas:
            Color(random(), random(), random())
            self.line = Line(points=[touch.pos[0], touch.pos[1]], width=2)

    def on_touch_move(self, touch):
        self.line.points = self.line.points + [touch.pos[0], touch.pos[1]]


class DrawingApp(App):

    def build(self):
        root_widget = DrawingWidget()
        return root_widget

DrawingApp().run()
I’ll demonstrate adding the new gui components in two ways; first in pure Python as has been demonstrated in previous tutorials, and second using kv language instead. So, here’s a Python implementation of the new features we want, beginning with importing the Widget classes we’ll need:
from kivy.uix.boxlayout import BoxLayout
from kivy.uix.label import Label
from kivy.uix.slider import Slider
Slider is a previously-unseen Widget displaying a draggable marker. We’ll be using a Slider for each primary colour (red, blue, green), and using this to set the Color when a Line is drawn.
We can now update the build method of DrawingApp, replacing the root widget and adding the new gui components:
class DrawingApp(App):

    def build(self):
        root_widget = BoxLayout(orientation='vertical')

        drawing_widget = DrawingWidget()

        red_slider = Slider(min=0, max=1, value=0.5,
                            size_hint_y=None, height=50)
        green_slider = Slider(min=0, max=1, value=0.5,
                            size_hint_y=None, height=50)
        blue_slider = Slider(min=0, max=1, value=0.5,
                            size_hint_y=None, height=50)

        colour_row = BoxLayout(orientation='horizontal',
                               size_hint_y=None, height=50)
        colour_label = Label(text='output colour:')
        colour_widget = Widget()

        # We draw a Rectangle on colour_widget exactly the same way as
        # with DrawingWidget, just without making a new class
        with colour_widget.canvas:
            output_colour = Color(red_slider.value,
                                  green_slider.value,
                                  blue_slider.value)
            output_rectangle = Rectangle()
        def update_colour_widget_rect(instance, value):
            output_rectangle.pos = colour_widget.pos
            output_rectangle.size = colour_widget.size
        colour_widget.bind(pos=update_colour_widget_rect,
                           size=update_colour_widget_rect)

        def update_colour_widget_colour(instance, value):
            output_colour.rgb = (red_slider.value,
                                 green_slider.value,
                                 blue_slider.value)
        red_slider.bind(value=update_colour_widget_colour)
        green_slider.bind(value=update_colour_widget_colour)
        blue_slider.bind(value=update_colour_widget_colour)

        root_widget.add_widget(drawing_widget)
        root_widget.add_widget(red_slider)
        root_widget.add_widget(green_slider)
        root_widget.add_widget(blue_slider)
        root_widget.add_widget(colour_row)

        colour_row.add_widget(colour_label)
        colour_row.add_widget(colour_widget)

        return root_widget
This is a lot of code to drop all at once, but read it carefully and you’ll see that it’s only the same concepts already introduced: we instantiate Widgets, add them to one another, and create bindings so that things automatically happen when Kivy properties are changed. In this case, we make use of the value Kivy property of the Slider widget, which gives its current value (changing automatically when the slider is moved).
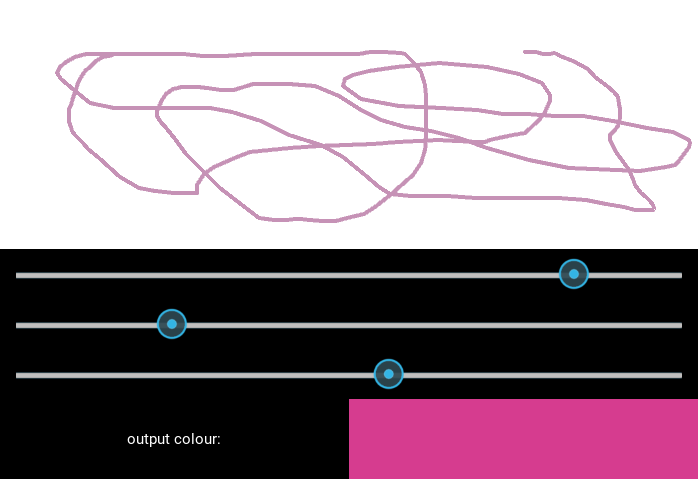
Run the code and you should see something like the image below. You can update the colour in the bottom right by moving the sliders.
A problem now becoming obvious is that all this code is kind of verbose, and also it can be a little unclear what is happening - Widget instantiation is in a different place to where the Widgets are added to one another, which is different again to where their events are bound. You can mitigate this with a careful app structure and following whatever coding conventions you like, but some of it is unavoidable given how Python works.
It’s for this reason that Kivy comes with kv language, a simple but powerful declaration language specifically designed for creating Kivy widget trees. If learning a new language sounds worrying…don’t be concerned! Kv isn’t a general purpose language, it doesn’t have much special syntax and is targeted specifically at Kivy widgets. It also uses normal Python code wherever possible (we’ll see that soon).
All of the kv language stuff discussed below is documented on the Kivy website; I’ll cover the basics, but you can find more information there.
First, get rid of all the Python code from above, and replace the root widget return with the following:
class Interface(BoxLayout):
    pass

class DrawingApp(App):

    def build(self):
        root_widget = Interface()
        return root_widget
Kv language works by writing rules for Widget classes, which will be automatically applied every time you instantiate one. We can use kv for almost everything added to the app so far, but this time we’ll construct the gui step by step to see how each part is added with the new kv syntax. We’ll be writing a kv rule for the new Interface class.
To start using kv language, write the following code in a file named drawing.kv. This name comes from the name of the App class, minus the App at the end if present, and in lowercase (e.g. if you named your App MySuperKivyApp you’d need to name the file mysuperkivy.kv). This is only necessary if you want the file to be automatically loaded, you can also load files or string manually. Our first kv code is:
<Interface>:
    orientation: 'vertical'
    Label:
        text: 'label added with kv'
        font_size: 50
Run the code again, and you should see the a Label with the given text, as the kv file is automatically loaded and its <Interface> rule applied.

This demonstrates the core rules of kv syntax. A kv rule is created with the <WidgetName>: syntax. You can make a rule for any widget, including built in ones (Kivy internally has a large kv file), and if you make multiple rules for the same Widget then all of them are applied one by one.
Below the rule creation, we indent by 4 spaces and define values for Kivy properties of the widget, and add child widgets. Lines like orientation: 'vertical' set Kivy properties just like we did previously in the Python code. Note that everything to the right of the colon is normal Python code - that doesn’t matter here, but for instance we could equally well write orientation: ''.join(['v', 'e', 'r', 't', 'i', 'c', 'a', 'l']) and it would be exactly the same. You can set any Kivy property of a widget in this way, finding the available options in the documentation as previously discussed.
We can also add child widgets by writing the widget name with a colon, then indenting by a further 4 spaces, as is done here with the Label. After this you can keep going as deep as you like, setting properties or adding more child widgets.
We can use these pieces of syntax to construct the previous Python interface entirely in kv:
<Interface>:
    orientation: 'vertical'
    DrawingWidget:
    Slider:
        min: 0
        max: 1
        value: 0.5
        size_hint_y: None
        height: 50
    Slider:
        min: 0
        max: 1
        value: 0.5
        size_hint_y: None
        height: 50
    Slider:
        min: 0
        max: 1
        value: 0.5
        size_hint_y: None
        height: 50
    BoxLayout:
        orientation: 'horizontal'
        size_hint_y: None
        height: 50
        Label:
            text: 'output colour:'
        Widget:
This hasn’t yet set up the event binding, but the full widget tree has been constructed entirely using the kv syntax described above. The immediate advantage of this is that kv language directly expresses the widget tree - there are no longer separate steps for instantiating Widgets, setting their properties and adding them to one another. Instead, you get to see everything at once.
This gui doesn’t yet have the behaviour of the Python one (i.e. having the sliders control output colour), but in the interest of keeping these tutorials relatively short, I’ll stop here for now. In the next tutorial will see how kv language also makes event binding very easy.
Next tutorial: More kv language
Full code
main.py:
from kivy.app import App
from kivy.uix.boxlayout import BoxLayout
from kivy.uix.slider import Slider

from kivy.uix.boxlayout import BoxLayout
from kivy.uix.label import Label
from kivy.uix.slider import Slider

from kivy.uix.widget import Widget
from kivy.graphics import Rectangle, Color, Line

from random import random

class DrawingWidget(Widget):
    def __init__(self):
        super(DrawingWidget, self).__init__()

        with self.canvas:
            Color(1, 1, 1, 1)
            self.rect = Rectangle(size=self.size,
                                  pos=self.pos)
        self.bind(pos=self.update_rectangle,
                  size=self.update_rectangle)

    def update_rectangle(self, instance, value):
        self.rect.pos = self.pos
        self.rect.size = self.size

    def on_touch_down(self, touch):
        super(DrawingWidget, self).on_touch_down(touch)

        if not self.collide_point(*touch.pos):
            return

        with self.canvas:
            Color(random(), random(), random())
            self.line = Line(points=[touch.pos[0], touch.pos[1]], width=2)

    def on_touch_move(self, touch):
        if not self.collide_point(*touch.pos):
            return

        self.line.points = self.line.points + [touch.pos[0], touch.pos[1]]


class Interface(BoxLayout):
    pass

class DrawingApp(App):

    def build(self):
        root_widget = Interface()
        return root_widget

DrawingApp().run()
drawing.kv:
<Interface>:
    orientation: 'vertical'
    DrawingWidget:
    Slider:
        min: 0
        max: 1
        value: 0.5
        size_hint_y: None
        height: 50
    Slider:
        min: 0
        max: 1
        value: 0.5
        size_hint_y: None
        height: 50
    Slider:
        min: 0
        max: 1
        value: 0.5
        size_hint_y: None
        height: 50
    BoxLayout:
        orientation: 'horizontal'
        size_hint_y: None
        height: 50
        Label:
            text: 'output colour:'
        Widget: