This is number 6 in a series of introductory Kivy tutorials.
Central themes: Handling touch or mouse input, more canvas instructions
In this tutorial we’ll directly add touch handling to the basic code developed in tutorial 5, starting with the code from last time:
from kivy.app import App
from kivy.uix.boxlayout import BoxLayout
from kivy.uix.slider import Slider

from kivy.uix.widget import Widget
from kivy.graphics import Rectangle, Color

class DrawingWidget(Widget):
    def __init__(self):
        super(DrawingWidget, self).__init__()

        with self.canvas:
            Color(1, 1, 1, 1)
            self.rect = Rectangle(size=self.size,
                                  pos=self.pos)
            Color(1, 0, 0, 1)  # note that we must reset the colour
            Rectangle(size=(300, 100),
                      pos=(300, 200))
        self.bind(pos=self.update_rectangle,
                  size=self.update_rectangle)

    def update_rectangle(self, instance, value):
        self.rect.pos = self.pos
        self.rect.size = self.size


class DrawingApp(App):

    def build(self):
        root_widget = DrawingWidget()
        return root_widget

DrawingApp().run()
We’ve already seen some input interaction via the Button widget, where we could bind to its on_press event to have a function called whenever the Button was clicked. This is great for a Button, but is not a general way to handle interaction - it gives no indication of the position of the touch, or any other information like the button clicked on the mouse.
Kivy achieves general mouse/touch handling via the on_touch_down, on_touch_move and on_touch_up methods of all Widget classes. Let’s dive in with an example, modifying our DrawingWidget:
from random import random

class DrawingWidget(Widget):
    def __init__(self):
        super(DrawingWidget, self).__init__()

        with self.canvas:
            Color(1, 1, 1, 1)
            self.rect = Rectangle(size=self.size,
                                  pos=self.pos)
            self.rect_colour = Color(1, 0, 0, 1)  # note that we must reset the colour
            Rectangle(size=(300, 100),
                      pos=(300, 200))
        self.bind(pos=self.update_rectangle,
                  size=self.update_rectangle)


    def update_rectangle(self, instance, value):
        self.rect.pos = self.pos
        self.rect.size = self.size

    def on_touch_down(self, touch):
        self.rect_colour.rgb = (random(), random(), random())
        print('touch pos is {}'.format(touch.pos))
Note that the only changes are to set self.rect_colour, and to add the on_touch_down method. Run the code now, and whenever you click the screen you should see the colour of the rectangle change.
How does this work? The answer is that whenever a mouse click or touch is registered, the root widget’s on_touch_down method is called, with a touch object holding information about the touch: you can see this here, where we access the pos of this object to get the pixel coordinates of its position. Each widget passes this touch object to all its children. For this reason, it’s important to call super(...) if you want the touch to also be passed to the current Widget’s children, though as it happens that’s not actually important here.
Note that although these methods are called on_touch_..., and I’ve called the argument touch, they are used for both mouse and touch handling; these events are handled in exactly the same way, except that the touch object may contain different information such as the button clicked (in the case of the mouse). I’ll mostly refer to this input as ‘touch’, but this always includes mouse interaction too.
The other methods I mentioned, on_touch_move and on_touch_up, work the same way; they are called whenever that thing happens, though only when on_touch_down has already happened, you don’t get events when moving the mouse without having clicked. We can use this to achieve drawing.
First, change the kivy.graphics import to include Line:
from kivy.graphics import Rectangle, Color, Line
Then, add modify on_touch_down and on_touch_move to draw and update a Line each time:
def on_touch_down(self, touch):
    super(DrawingWidget, self).on_touch_down(touch)

    with self.canvas:
        Color(random(), random(), random())
        self.line = Line(points=[touch.pos[0], touch.pos[1]], width=2)

def on_touch_move(self, touch):
    self.line.points = self.line.points + [touch.pos[0], touch.pos[1]]
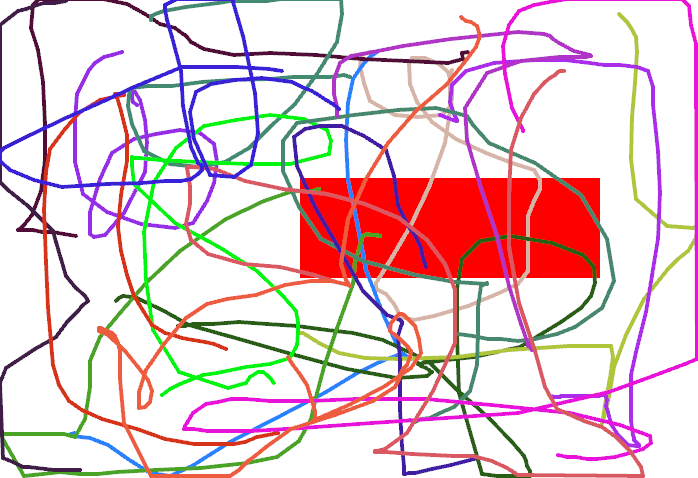
Run the code again, and try clicking and dragging…you should see a line! Each time you click and drag the line has a different colour, as we add a new random Color instruction before its instruction each time. We’re updating it by adding the x and y value of the touch position to the Line’s points, every time the touch is moved.

You can also note that we only use with self.canvas when the Line is instantiated - not when it is updated. This is because we only need to add the Line canvas instruction to the canvas once, after that the gui will automatically be updated whenever the Line changes, including if we modified e.g. its width. Try changing self.line.width in on_touch_move and see what happens.
Note: This way of storing the line (in self.line) isn’t very robust if there are multiple simultaneous interactions, e.g. in a multitouch display. This is easy to resolve by storing the reference somewhere more appropriate, e.g. we could set touch.ud['line'] to store a reference specific to the touch object (ud stands for “user dictionary”, see the documentation). You might like to try implementing this.
You could continue here by experimenting with other actions in response to touches, such as drawing different things (e.g. a Rectangle at the touch position rather than a Line) or doing more complex modifications to existing instructions.
With the basic drawing apparatus set up, the next tutorial will introduce the kv markup language, showing how a gui can easily be constructed without some of the Python boilerplate that comes from using a general purpose language for creating a gui.
Next tutorial: Introducing kv language
Full code
main.py:
from kivy.app import App
from kivy.uix.boxlayout import BoxLayout
from kivy.uix.slider import Slider

from kivy.uix.widget import Widget
from kivy.graphics import Rectangle, Color, Line

from random import random

class DrawingWidget(Widget):
    def __init__(self):
        super(DrawingWidget, self).__init__()

        with self.canvas:
            Color(1, 1, 1, 1)
            self.rect = Rectangle(size=self.size,
                                  pos=self.pos)
            self.rect_colour = Color(1, 0, 0, 1)  # note that we must reset the colour
            Rectangle(size=(300, 100),
                      pos=(300, 200))
        self.bind(pos=self.update_rectangle,
                  size=self.update_rectangle)


    def update_rectangle(self, instance, value):
        self.rect.pos = self.pos
        self.rect.size = self.size

    def on_touch_down(self, touch):
        super(DrawingWidget, self).on_touch_down(touch)

        with self.canvas:
            Color(random(), random(), random())
            self.line = Line(points=[touch.pos[0], touch.pos[1]], width=2)

    def on_touch_move(self, touch):
        self.line.points = self.line.points + [touch.pos[0], touch.pos[1]]


class DrawingApp(App):

    def build(self):
        root_widget = DrawingWidget()
        return root_widget

DrawingApp().run()