Stress-testing kivy with the recorder module.

In a framework like kivy, or any app using it it can happen that there is a bug that precise interaction is needed to reproduce, and it can be frustrating to manually test every time, sometime a complex or repetitive manipulation.

Kivy has a not-so-well known module, called recorder that allows to record and replay user inputs, both touch and keyboard events.

python main.py -m recorder

f8 to record, f7 to replay, ‘simple as that!

It’s helpful, but in some cases, something is missing, for example, an user reported a memory leak in 1.7.2, apparently windows specific, that happened to crash the app (the touchracer demo) after a lot of touches, over a very long time (hours) of usage. You don’t want to record hours of touches just to replay them, at least, i didn’t want to.

So i did a little update to this module, to add the feature of playing the same replay times and time over, i recorded a sample of one touch (the touch duration didn’t matter), as i wasn’t very fast (i’m only human), this recording lasted nearly a second (starting to record, touch down, touch up, stoping record), so i fired my editor of choice, and edited the recorder.kvi to:

#RECORDER1.0
(.0118309783935547, 'begin', 1, {'is_touch': True, 'profile': ['pos'], 'sy': 0.9688715953307393, 'sx': 0.08692628650904033})
(.0642069625854492, 'end', 1, {'is_touch': True, 'profile': ['pos'], 'sy': 0.9688715953307393, 'sx': 0.08692628650904033})

Note that the times are now quite low, so this recording will be played dozens of time a second, and i removed over events, such as the keyboard ones.

With this, it was a lot easier to observe the leak on 1.7.2, memory was raising fast enough to observe.

Now, i knew we had a few memory leak fixes in master, so to check we had gotten ride of this one, i just had to replay this very same test on the last version.
And if needed, git-bisect will tell me which one did fix it, without too much effort on my side.

And it was indeed fixed!

Position/Size of widgets in kivy.

I see it’s a common struggle for people to understand how to manage size and positions of the widgets in kivy.

There is not much to it, really, just a few principles to understand, but they are better explained by example, i believe.

dumb positionning

Let’s create a root widget, and put two buttons in it.

root = Widget()
b1 = Button()
b2 = Button()
root.add_widget(b1)
root.add_widget(b2)

What will happen when i return root to be used as my root widget? As a root widget, it will have all the space for itself, the two buttons, however, will only use their default size, which is (100, 100), and will use their default position, which is (0, 0), the bottom-left corner of the screen.

We can change b1 and b2 positions to absolute values, let’s change line 2 and 3 to:

b1 = Button(pos=(100, 100))
b2 = Button(pos=(200, 200))

something a little smarter

Now, that doesn’t make for a very flexible UI, if you ask me, it would be better to use the parent size to decide where to place the buttons, no?

b1 = Button(pos=(root.x, root.height / 2))
b2 = Button(pos=(root.width - 100, root.height / 2))

No, that’s not much smarter, it’s still quite dumb actually, it doesn’t even work, why? because we just instanciated root, it’s not even the root widget yet, it doesn’t have its final size, so our widgets will use the default value of (100, 100), for their calculations, no - no.

Let’s fix this with bindings.

b1 = Button()
root.bind(size=reposition_b1, pos=reposition_b1)
b2 = Button()
root.bind(size=reposition_b2, pos=reposition_b2)

Where these two functions will be along the lines of:

def reposition_b1(root, *args):
    b1.pos = root.x, root.height / 2 - b1.height / 2

Also, widget have nice alias properties for things like height / 2, x + width, x + width / 2, here is a quick table:

right = x + width
top = y + height
center_x = x + width / 2
center_y = y + height / 2
center = (center_x, center_y)

and actually, pos is just an alias property for (x, y). Alias Properties works both ways, so we can use them to set our positions in a simpler way.

def reposition_b1(root, *args):
    b1.x = root.x
    b1.center_y = root.center_y

A lot of work for not so much, right? That’s because we are not using the right tools!

Let’s jump on a layout, specifically FloatLayout.

FloatLayout to the rescue

Layouts are here to make our life easier when constructing an UI.

FloatLayout is very flexible, it lets you set rules for positions, or do things in the absolute way.

root = FloatLayout()
b1 = Button(pos_hint={'x': 0, 'center_y': .5})
b2 = Button(pos_hint={'right': 1, 'center_y': .5})

pos_hint will make the values relative to the size/position of the parent. So here, for b1 x will be the x of the parent, and center_y will be at the middle between y and top.

Now, if you run this, you may get a surprise, because FloatLayout also made b1 and b2 sizes relative to root.size, and the default value being (1, 1), they both have the same size as the root widget, sometime you want to keep that relative, maybe with a different value, sometime you want to have them keep the value passed in size (or default size value), if so, you can pass (None, None) to size_hint.

b1 = Button(pos_hint={'x': 0, 'center_y': .5}, size_hint=(None, None))

Conclusion

I’ll probably do other posts on the subject, because there is much more to it, but the basic principles are here. I anyway really encourage you to look at this section of the documentation, which go further with the various kind of layouts you have access to.

Position/Size of widgets in kivy.

I see it’s a common struggle for people to understand how to manage size and positions of the widgets in kivy.

There is not much to it, really, just a few principles to understand, but they are better explained by example, i believe.

dumb positionning

Let’s create a root widget, and put two buttons in it.

root = Widget()
b1 = Button()
b2 = Button()
root.add_widget(b1)
root.add_widget(b2)

What will happen when i return root to be used as my root widget? As a root widget, it will have all the space for itself, the two buttons, however, will only use their default size, which is (100, 100), and will use their default position, which is (0, 0), the bottom-left corner of the screen.

We can change b1 and b2 positions to absolute values, let’s change line 2 and 3 to:

b1 = Button(pos=(100, 100))
b2 = Button(pos=(200, 200))

something a little smarter

Now, that doesn’t make for a very flexible UI, if you ask me, it would be better to use the parent size to decide where to place the buttons, no?

b1 = Button(pos=(root.x, root.height / 2))
b2 = Button(pos=(root.width - 100, root.height / 2))

No, that’s not much smarter, it’s still quite dumb actually, it doesn’t even work, why? because we just instanciated root, it’s not even the root widget yet, it doesn’t have its final size, so our widgets will use the default value of (100, 100), for their calculations, no - no.

Let’s fix this with bindings.

b1 = Button()
root.bind(on_size=reposition_b1, on_pos=reposition_b1)
b2 = Button()
root.bind(on_size=reposition_b2, on_pos=reposition_b2)

Where these two functions will be along the lines of:

def reposition_b1(root, *args):
    b1.pos = root.x, root.height / 2 - b1.height / 2

Also, widget have nice alias properties for things like height / 2, x + width, x + width / 2, here is a quick table:

right = x + width
top = y + height
center_x = x + width / 2
center_y = y + height / 2
center = (center_x, center_y)

and actually, pos is just an alias property for (x, y). Alias Properties works both ways, so we can use them to set our positions in a simpler way.

def reposition_b1(root, *args):
    b1.x = root.x
    b1.center_y = root.center_y

A lot of work for not so much, right? That’s because we are not using the right tools!

Let’s jump on a layout, specifically FloatLayout.

FloatLayout to the rescue

Layouts are here to make our life easier when constructing an UI.

FloatLayout is very flexible, it lets you set rules for positions, or do things in the absolute way.

root = FloatLayout()
b1 = Button(pos_hint={'x': 0, 'center_y': .5})
b2 = Button(pos_hint={'right': 1, 'center_y': .5})

pos_hint will make the values relative to the size/position of the parent. So here, for b1 x will be the x of the parent, and center_y will be at the middle between y and top.

Now, if you run this, you may get a surprise, because FloatLayout also made b1 and b2 sizes relative to root.size, and the default value being (1, 1), they both have the same size as the root widget, sometime you want to keep that relative, maybe with a different value, sometime you want to have them keep the value passed in size (or default size value), if so, you can pass (None, None) to size_hint.

b1 = Button(pos_hint={'x': 0, 'center_y': .5}, size_hint=(None, None))

Conclusion

I’ll probably do other posts on the subject, because there is much more to it, but the basic principles are here. I anyway really encourage you to look at this section of the documentation, which go further with the various kind of layouts you have access to.

Producer/Consumer model in Kivy

(update: original title was “Publisher/Consumer model with Kivy”, but the literature usually refer to this as “Producer/Consumer”)

Few things are worse to an user than an unresponsive UI, well i can think of a crashing UI, of course, but not much more. So, in an event driven environment, it’s important to avoid blocking the UI for too long.

But sometime you have a task that will take an unacceptable time for such constraint, if the task can’t really be chunked, a Thread is likely to be the acceptable solution, but threads have constraints and in Kivy, you can’t update the UI from one, you have to schedule something to happen on the main thread, and update things from here. If the task is chunkable, it’s even easier, but the following idea can apply to both situation.

So, a solution that i find convenient, is to use a producer/consumer model.

The idea is simple, have a scheduled action each frame do a small part of your task, until a timeout is triggered, and then wait for next frame to continue.
To trigger work, just put (produce) it in a list of tasks to be treated py the consumer.

So let’s start by setting a consumer for adding elements to a list, we don’t want to add 100 elements in the same frame, because that would take too much time.

from kivy.app import App
from kivy.clock import Clock
from kivy.lang import Builder
from kivy.properties import ListProperty
from kivy.uix.label import Label

kv = '''
BoxLayout:
    ScrollView:
        GridLayout:
            cols: 1
            id: target
            size_hint: 1, None
            height: self.minimum_height
     Button:
        text: 'add 100'
        on_press: app.consumables.extend(range(100))
'''

class ProdConApp(App):
    consumables = ListProperty([])

    def build(self):
        Clock.schedule_interval(self.consume, 0)
        return Builder.load_string(kv)'

    def consume(self, *args):
        if self.consumables:
            item = self.consumables.pop(0)
            label = Label(text='%s' % item)
            self.root.ids.target.add_widget(label)

if __name__ == '__main__':
    ProdConApp().run()

Now, i’m only taking one item each frame, it’s probably good enough, but if we have a lot of item, we still may want to take as much is possible, considering kivy loop is frame-limited to 60fps, 100 items will take more than a second, why wait if we have the power? Let’s use a slightly smarter version.

add this import near of the top

from kivy.clock import _default_time as time

then change consume definition to be:

def consume(self, *args):
    limit = Clock.get_time() + 1 / 60.
    while self.consumables and time() < limit:
        item = self.consumables.pop(0)
        label = Label(text='%s' % item)
        self.root.ids.target.add_widget(label)

Of course, this only work because we know creating and adding one widget takes considerably less time than one frame, so it’s not like one of such operation will make our loop hang too long.

Now, filling the consumable list here is done from main UI, but it could totally be done from a Thread, assuming locking is correctly handled (or that extend/pop are atomic, which seems to be the case), so if your filling of work to be displayed is slow, doing the exact same thing as a background task will allow you to do heavy lifting, while keeping your app snappy.

A slightly more demonstrative version of this example can be found here

Building a background application on android with Kivy.

Kivy runs on android using the python-for-android project, which support android services. This works in a simple way, you basically bundle two main.py in your application, one for the UI, one for the service. The UI can start the services on start. From that point though, things may be a little uneasy. Why? Because you have two applications, and now you have to make them talk to each over if you want to do anything useful.

Android’s way of having an Activity and a Service talk to each other is Broadcast signals, which can be limited to part of your applications, howether, it’s not straightforward to use them with pyjnius, which is the magical interface we use to use java code from python.

Another way is to use network, i’ve been doing it with twisted in the past, setting a twisted server in the Service, and using twisted as a client in the Activity, howether, i find this to be heavy lifting for the trivial task of communicating between two programs on the same device. And including Twisted in your app, certainly add some weight to it.

Howether, in order to support TUIO, kivy ships with a simple OSC implementation, OSC is a simple connectionless network protocol, that allow you to pack messages, and send them to an ip/port/api URI, turns out we don’t need anything more, and a connectionless protocol avoid us dealing with disconnections (like the UI being closed, or the service not being started yet) that could give us some headaches (and certainly gave me some). We just need to have both part of the program listen for OSC messages, and have them send data to each other, if confirmation is needed, it’s possible to have a messages been sent back on a specific api.

So let’s get started.

getting a minimal kivy app

The usual things, let’s put a simple UI with a Button.

from kivy.app import App
from kivy.lang import Builder

kv = '''
Button:
    text: 'push me!'
'''

class ServiceApp(App):
    def build(self):
        return Builder.load_string(kv)

if __name__ == '__main__':
    ServiceApp().run()

here we just load a kv string that defines a button, and return the result, nothing fancy.

getting a minimal service

from time import sleep

if __name__ == '__main__':
    while True:
        sleep(.1)

Yeah, nothing much needed, actually, the sleep isn’t even needed, but the program have to run, and we’ll need this loop anyway.

starting the service

For your service to run, you need to tell your UI to start it.

from kivy.app import App
from kivy.lang import Builder
from kivy.utils import platform

kv = '''
Button:
    text: 'push me!'
'''

class ServiceApp(App):
    def build(self):
        if platform == 'android':
            from android import AndroidService
            service = AndroidService('my pong service', 'running')
            service.start('service started')
            self.service = service

        return Builder.load_string(kv)

if __name__ == '__main__':
    ServiceApp().run()

We make the test for android, so you can still test your app on desktop, by starting manually both parts.

Packaging them for android

both files must be named main.py, the UI one is at the root of the project, the other one is in a service directory directly under the root of the project.

├── main.py
└── service
    └── main.py

To package, i’ll be using buildozer.

As we are using network don’t forget to add the NETWORK permission when editing buildozer.spec

buildozer init
editor buildozer.spec
buildozer android debug deploy run logcat

After some time, you should see the (not very exciting) app start on your plugged android device.

setting up OSC

Whatever the side, OSC needs a port to listen on, and to have functions to call when things happen. The basic setup is simple.

from kivy.lib import osc

def some_api_callback(message, *args):
   print("got a message! %s" % message)

osc.init()
oscid = osc.listen(ipAddr='0.0.0.0', port=someport)
osc.bind(oscid, some_api_callback, '/some_api')

and then

osc.readQueue(oscid)

needs to be called regularly.

for the service, we’ll just put this call in the loop:

from time import sleep
from kivy.lib import osc

service = 3000

def some_api_callback(message, *args):
   print("got a message! %s" % message)

if __name__ == '__main__':
    osc.init()
    oscid = osc.listen(ipAddr='127.0.0.1', port=service)
    osc.bind(oscid, some_api_callback, '/some_api')

    while True:
        osc.readQueue(oscid)
        sleep(.1)

And for UI, we’ll use kivy.clock.Clock’s schedule_interval method.

from kivy.app import App
from kivy.lang import Builder
from kivy.lib import osc
from kivy.utils import platform
from kivy.clock import Clock

activityport = 3001

def some_api_callback(message, *args):
   print("got a message! %s" % message)

kv = '''
Button:
    text: 'push me!'
'''

class ServiceApp(App):
    def build(self):
        if platform == 'android':
            from android import AndroidService
            service = AndroidService('my pong service', 'running')
            service.start('service started')
            self.service = service

        osc.init()
        oscid = osc.listen(ipAddr='127.0.0.1', port=activityport)
        osc.bind(oscid, some_api_callback, '/some_api')
        Clock.schedule_interval(lambda *x: osc.readQueue(oscid), 0)

        return Builder.load_string(kv)

if __name__ == '__main__':
    ServiceApp().run()

Now, both sides can receive messages, that’s a good first step, but nothing will really happen, since none of them send any message.

sending messagse

The osc api to send message is very simple:

osc.sendMsg(api, data_list, port=someport, ipAddr=someaddress)

now, ipAddr is by default localhost, which is fine for us, so we only need to find the api we want to hit, the data list, and the port, which will be the one the other side listens on.

Let’s make our button send a message to the Service.

from kivy.app import App
from kivy.lang import Builder
from kivy.lib import osc
from kivy.clock import Clock

activityport = 3001
serviceport = 3000

def some_api_callback(message, *args):
   print("got a message! %s" % message)

kv = '''
Button:
    text: 'push me!'
    on_press: app.ping()
'''

class ServiceApp(App):
    def build(self):
        if platform == 'android':
            from android import AndroidService
            service = AndroidService('my pong service', 'running')
            service.start('service started')
            self.service = service

        osc.init()
        oscid = osc.listen(ipAddr='127.0.0.1', port=activityport)
        osc.bind(oscid, some_api_callback, '/some_api')
        Clock.schedule_interval(lambda *x: osc.readQueue(oscid), 0)

        return Builder.load_string(kv)

    def ping(self):
        osc.sendMsg('/some_api', ['ping', ], port=someotherport)


if __name__ == '__main__':
    ServiceApp().run()

Yes, at that point, you can run it, and see that when you press the button, your adb logcat on android, yay!

Now, let’s make our service answer, and our UI display the answer!

from time import sleep
from kivy.lib import osc

serviceport = 3000
activityport = 3001

def some_api_callback(message, *args):
    print("got a message! %s" % message)
    answer_message()

def answer_message():
    osc.sendMsg('/some_api', [asctime(localtime()), ], port=activityport)

if __name__ == '__main__':
    osc.init()
    oscid = osc.listen(ipAddr='127.0.0.1', port=serviceport)
    osc.bind(oscid, some_api_callback, '/some_api')

    while True:
        osc.readQueue(oscid)
        sleep(.1)

and for the UI to answer:

from kivy.app import App
from kivy.lang import Builder
from kivy.lib import osc
from kivy.utils import platform
from kivy.clock import Clock

activityport = 3001
serviceport = 3000

kv = '''
Button:
    text: 'push me!'
    on_press: app.ping()
'''

class ServiceApp(App):
    def build(self):
        if platform == 'android':
            from android import AndroidService
            service = AndroidService('my pong service', 'running')
            service.start('service started')
            self.service = service

        osc.init()
        oscid = osc.listen(ipAddr='127.0.0.1', port=activityport)
        osc.bind(oscid, some_api_callback, '/some_api')
        Clock.schedule_interval(lambda *x: osc.readQueue(oscid), 0)

        return Builder.load_string(kv)

    def ping(self):
        osc.sendMsg('/some_api', ['ping', ], port=someotherport)

    def some_api_callback(self, message, *args):
        print("got a message! %s" % message)
        self.root.text += '\n%s' % message[2]

if __name__ == '__main__':
    ServiceApp().run()

The only thing a bit confusing here is that the real message is in message[2], don’t ask me why, it’s probably explained in some documenation i didn’t care enough to search for :).

conclusion

That’s not much code! And it should be quite easy to extend to allow for more complex patterns, detecting if your service is running or not can be done by making it send pings at regular intervals, you can also make your service fetch/work on data from somewhere else in the background, and pass it to the UI when it’s ready.

A slightly more complex demo based on this can be found here.
Using Facebook SDK with Python-for-Android / Kivy

For another museum project, Arnaud asked me to see if we could integrate Facebook in an app on Android. The usual libraries are made for desktop, and manually open a webbrowser to handle the user authorization. But that’s not really nice for us, it would be nicer to have a native integration instead. Let’s see how we can use the official Facebook Android SDK.

Prerequisites

You’ll need to have:
– Kivy’s python-for-android
– A Facebook account (obviously)
Facebook SDK 3.0

Get the example

Clone the Kivy/Facebook example:

$ git clone https://github.com/tito/p4a-facebook-example

Register a Facebook application

  1. Go to the Facebook developers interface
  2. Click on Sélection_107
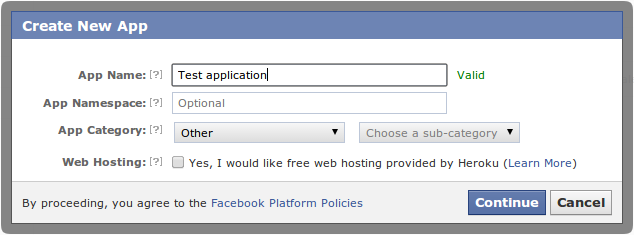
  3. Fill the information “App Name”. Don’t put “FB” or “Facebook” in the title, or your application name will be considered as Invalid 🙂
    Sélection_108
  4. Pass the captcha
  5. Write down your application id somewhereSélection_111
  6. Now, you need to activate Native Android App. The package name is the same name as the one we will pass in --package when building the APK. The Class Name is the packagename/activity. Activity class is always the same for all the applications compiled with python-for-android.
    Sélection_109
  7. Right now, the Facebook Android SDK will not authorize our android application to be used, because Facebook want to know the signature hash that will be used by our generated APK. To generate the key hashes, you need to use the keytool. Here is an example for the android “debug” key:
    $ keytool -exportcert -alias androiddebugkey \    -keystore ~/.android/debug.keystore | \    openssl sha1 -binary | openssl base64 Enter keystore password:  android u+bzQmG87L298C4KGM8yODi3W/4=

    Copy the generated key hash, and paste it to the field:

    Sélection_110
  8. Setup the our application
  1. Go into p4a-facebook-example, and edit the main.py
  2. Search for FACEBOOK_APP_ID, and replace with your own Application Id
  3. Go into python-for-android, and create a distribution:
    $ ./distribute.sh -m 'kivy'
  4. Go into the dist/default
  5. Generate the APK one time (for generating all the file we need to customize). Replace /path/to/p4a-facebook-example:
    ./build.py --name "Facebook test" --package org.test.facebook \
      --version 1 --private /path/to/p4a-facebook-example/ \
      --window --permission INTERNET debug
  6. Add a new reference to project.properties to include the Facebook SDK. The path to the Facebook SDK MUST be a relative path, otherwise you’ll get issues during the next build.
    android.library.reference.1=../../facebook-android-sdk-3.0.2/facebook
  7. Edit the templates/AndroidManifest.tmpl.xml to include the Facebook login activity, just under the <application>:
     
  8. Rebuild your application… and you’re ready to test 🙂
  9. Install the application on your device:
    adb install -r bin/Facebooktest-1-debug.apk

Test your application

The Facebook SDK 3.0 require to separate read and publish permissions. To the user, it means you’ll have 2 dialog to accept. Even if you just want to publish to the application stream, you need to have the basic permission (read) accepted by the user before publish permissions. This is already implemented in the example app.

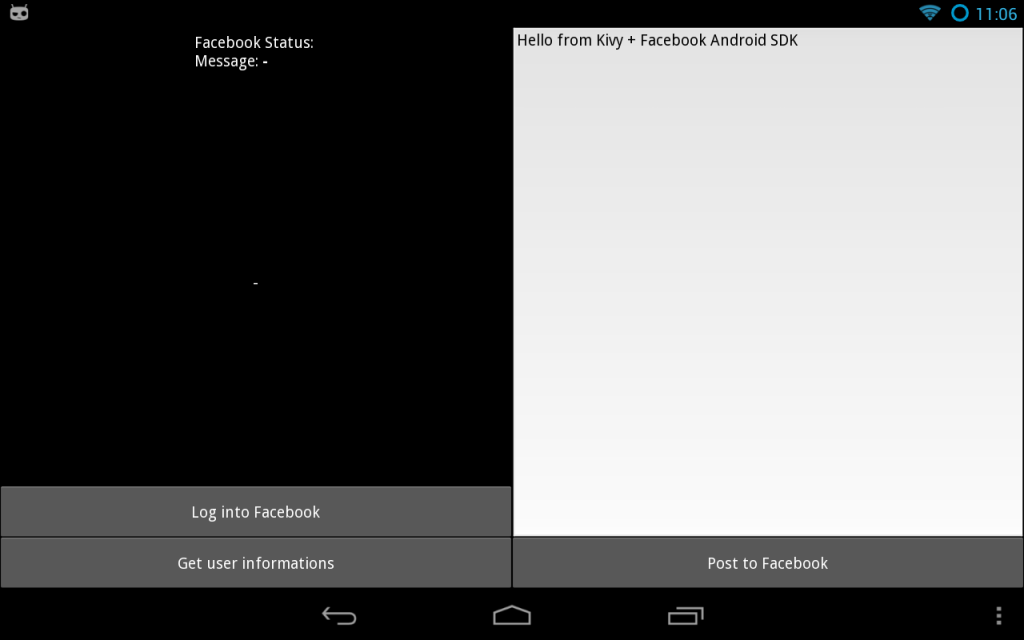
When you start the application the first time, you’ll have:

device-2013-08-08-110647

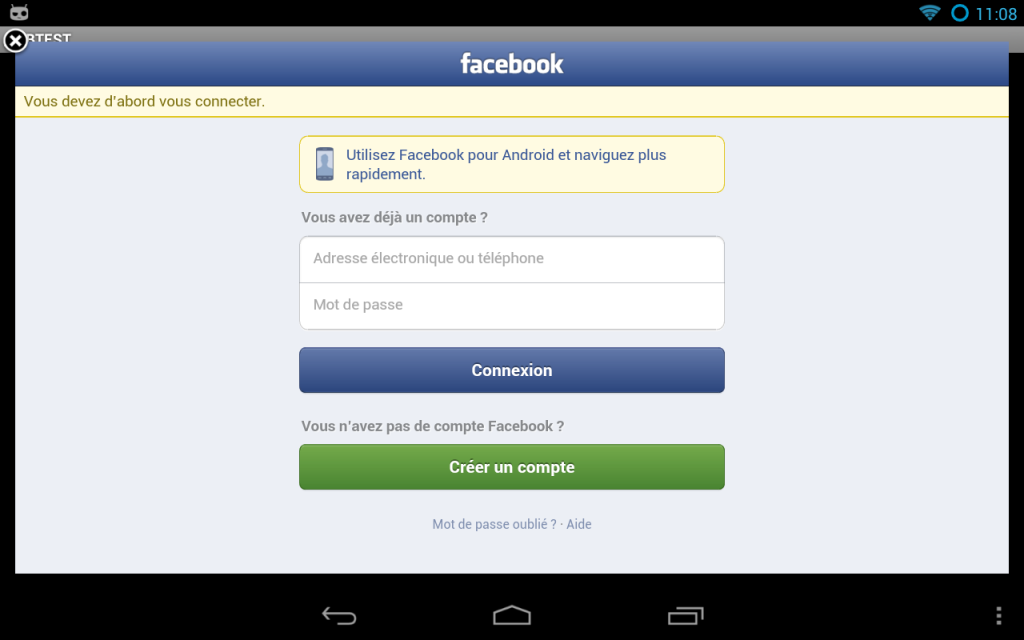
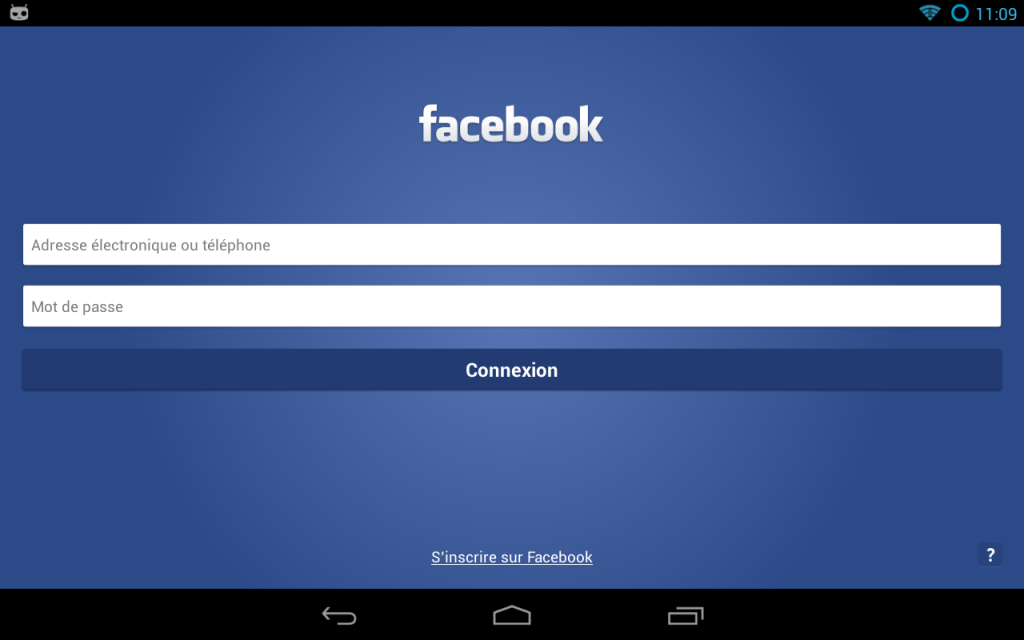
Depending if you have the Native Facebook application or not, you’ll have 2 kinds of authentification boxes.

device-2013-08-08-110834

Without Facebook installed on the device:

And with Facebook installed on the device:

device-2013-08-08-111002

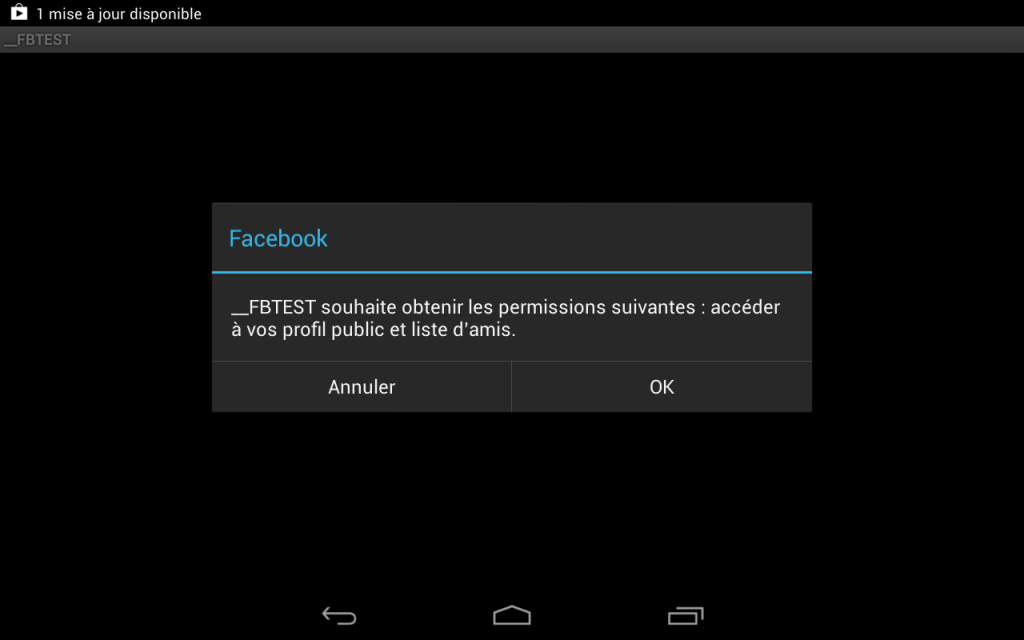
After authentication, the user will need to accept our permissions:

device-2013-08-08-111111

It’s done!

The application have now the right to post 🙂 The example post in the user stream as the application itself, not as the user. It’s called “publish_actions”.

Getting further

Obviously, when you use the Facebook SDK itself, you feel the pain of an API designed for Java. For every callback that Facebook want to call, you need to implement a Java class and define the callback method. Python is really simpler and fun to use.

See for yourself: we want to make a call of “Request.newStatusUpdateRequest“. Se weed first to implement a GraphUserCallback class, in Java. Thanks to Pyjnius, we can do it directly in Python:

Python
class _FacebookGraphUserCallback(PythonJavaClass):

    __javainterfaces__ = ['com.facebook.Request$GraphUserCallback']
    __javacontext__ = 'app'

    def __init__(self, callback):
        self.callback = callback
        super(_FacebookGraphUserCallback, self).__init__()

    @java_method('(Lcom/facebook/model/GraphUser;Lcom/facebook/Response;)V')
    def onCompleted(self, user, response):
        self.callback(user, response)

This Python/Java class will call our own python callback when the Java callback onCompleted will be called. Then:

Python
@run_on_ui_thread
def post(self, text, callback):
    req = Request.newStatusUpdateRequest(
            self._session, text, _FacebookRequestCallback(callback))
    req.executeAsync()

All you have to do at the end, is to call the post method:

Python
def fb_post(self, text):
    def callback(*args):
        from time import time
        self.post_status = 'message posted at {}'.format(time())
    self.facebook.post(text, callback=callback)

I don’t provide a wrapper around all the possible Request method you can do with Facebook. I just have an example for “post” and “me”. Both wrap “Request.newStatusUpdateRequest” and “Request.newMeRequest“. Please note that every request call must happen in the UI thread. Use the python-for-android/runnable module for that, with @run_on_ui_thread decorator.

The end

It was not easy to get it right, and it still complex to make all the pieces together. I’ve tried to use their own LoginButton (because they said that’s how they want it, everywhere), but i’ve not be able to use it in our app. Mostly because the LoginButton is a pure android widget, and because it doesn’t want to bring back the Activity after login. I was stuck too much time on it, and preferred to go in another way.
Please note that you should not share an application with a fake Facebook button, the design / look-and-feel must be the same as the original one.

I hope that will help some of you to get started !

Using Facebook SDK with Python-for-Android / Kivy

For another museum project, Arnaud asked me to see if we could integrate Facebook in an app on Android. The usual libraries are made for desktop, and manually open a webbrowser to handle the user authorization. But that’s not really nice for us, it would be nicer to have a native integration instead. Let’s see how we can use the official Facebook Android SDK.

Prerequisites

You’ll need to have:
– Kivy’s python-for-android
– A Facebook account (obviously)
Facebook SDK 3.0

Get the example

Clone the Kivy/Facebook example:

$ git clone https://github.com/tito/p4a-facebook-example

Register a Facebook application

  1. Go to the Facebook developers interface
  2. Click on Sélection_107
  3. Fill the information “App Name”. Don’t put “FB” or “Facebook” in the title, or your application name will be considered as Invalid :)
    Sélection_108
  4. Pass the captcha
  5. Write down your application id somewhereSélection_111
  6. Now, you need to activate Native Android App. The package name is the same name as the one we will pass in --package when building the APK. The Class Name is the packagename/activity. Activity class is always the same for all the applications compiled with python-for-android.
    Sélection_109
  7. Right now, the Facebook Android SDK will not authorize our android application to be used, because Facebook want to know the signature hash that will be used by our generated APK. To generate the key hashes, you need to use the keytool. Here is an example for the android “debug” key:
    $ keytool -exportcert -alias androiddebugkey \
       -keystore ~/.android/debug.keystore | \
       openssl sha1 -binary | openssl base64
    Enter keystore password:  android
    u+bzQmG87L298C4KGM8yODi3W/4=

    Copy the generated key hash, and paste it to the field:

    Sélection_110

Setup the our application

  1. Go into p4a-facebook-example, and edit the main.py
  2. Search for FACEBOOK_APP_ID, and replace with your own Application Id
  3. Go into python-for-android, and create a distribution:

    $ ./distribute.sh -m 'kivy'

  4. Go into the dist/default
  5. Generate the APK one time (for generating all the file we need to customize). Replace /path/to/p4a-facebook-example:

    ./build.py --name "Facebook test" --package org.test.facebook \
      --version 1 --private /path/to/p4a-facebook-example/ \
      --window --permission INTERNET debug

  6. Add a new reference to project.properties to include the Facebook SDK. The path to the Facebook SDK MUST be a relative path, otherwise you’ll get issues during the next build.

    android.library.reference.1=../../facebook-android-sdk-3.0.2/facebook

  7. Edit the templates/AndroidManifest.tmpl.xml to include the Facebook login activity, just under the <application>:

    <application android:label="@string/appName" android:icon="@drawable/icon">
    <activity android:name="com.facebook.LoginActivity"/>

  8. Rebuild your application… and you’re ready to test :)
  9. Install the application on your device:

    adb install -r bin/Facebooktest-1-debug.apk

Test your application

The Facebook SDK 3.0 require to separate read and publish permissions. To the user, it means you’ll have 2 dialog to accept. Even if you just want to publish to the application stream, you need to have the basic permission (read) accepted by the user before publish permissions. This is already implemented in the example app.

When you start the application the first time, you’ll have:

device-2013-08-08-110647

Depending if you have the Native Facebook application or not, you’ll have 2 kinds of authentification boxes.

Without Facebook installed on the device:
device-2013-08-08-110834

And with Facebook installed on the device:

device-2013-08-08-111002

After authentication, the user will need to accept our permissions:

device-2013-08-08-111111

It’s done!

The application have now the right to post :) The example post in the user stream as the application itself, not as the user. It’s called “publish_actions”.

Getting further

Obviously, when you use the Facebook SDK itself, you feel the pain of an API designed for Java. For every callback that Facebook want to call, you need to implement a Java class and define the callback method. Python is really simpler and fun to use.

See for yourself: we want to make a call of “Request.newStatusUpdateRequest“. Se weed first to implement a GraphUserCallback class, in Java. Thanks to Pyjnius, we can do it directly in Python:

class _FacebookGraphUserCallback(PythonJavaClass):

    __javainterfaces__ = ['com.facebook.Request$GraphUserCallback']
    __javacontext__ = 'app'

    def __init__(self, callback):
        self.callback = callback
        super(_FacebookGraphUserCallback, self).__init__()

    @java_method('(Lcom/facebook/model/GraphUser;Lcom/facebook/Response;)V')
    def onCompleted(self, user, response):
        self.callback(user, response)

This Python/Java class will call our own python callback when the Java callback onCompleted will be called. Then:

@run_on_ui_thread
    def post(self, text, callback):
        req = Request.newStatusUpdateRequest(
                self._session, text, _FacebookRequestCallback(callback))
        req.executeAsync()

All you have to do at the end, is to call the post method:

def fb_post(self, text):
        def callback(*args):
            from time import time
            self.post_status = 'message posted at {}'.format(time())
        self.facebook.post(text, callback=callback)

I don’t provide a wrapper around all the possible Request method you can do with Facebook. I just have an example for “post” and “me”. Both wrap “Request.newStatusUpdateRequest” and “Request.newMeRequest“. Please note that every request call must happen in the UI thread. Use the python-for-android/runnable module for that, with @run_on_ui_thread decorator.

The end

It was not easy to get it right, and it still complex to make all the pieces together. I’ve tried to use their own LoginButton (because they said that’s how they want it, everywhere), but i’ve not be able to use it in our app. Mostly because the LoginButton is a pure android widget, and because it doesn’t want to bring back the Activity after login. I was stuck too much time on it, and preferred to go in another way.
Please note that you should not share an application with a fake Facebook button, the design / look-and-feel must be the same as the original one.

I hope that will help some of you to get started !

Kivy hackathon in paris

Last week saw the first 24h hackathon event entirely dedicated to Kivy happening, in Paris. It was initiated by a hightly motivated student of the Cifacom school in paris, David Scheck, and attended by 4 groups of students, each with 3 to 5 members. I was pleased to share the hard task to help students discover the technology with my colleague Julien Miotte, from Majerti during the event.

The student weren’t very familiar with Python, and totally new to kivy, so it was a really challenging situation for both the student and the framework, would they be able to achieve anything in the hard limit of 24 hours?

First, after the students brainstormed on their project ideas, we got them through the major concepts and important classes of Kivy, using the Getting started page, it’s hard to get the point of properties accross in 10 minutes to student that didn’t have experienced the need of them, but I tried to at least make them aware it would be useful. The kv language presentation at this point, even if rudimentary, was probably useful, as we will see later.

Then students went on to try to build their project, except for a few quickly solved issues with windows installation, the starting was smooth. Julien and I gave some more explanations about how to start building a basic App (the doc is there, but who reads the doc? ;)) and people started designing their interface, and build the core of their application.

Eat Smart

One of the most required feature was certainly the use of multiple screens in an application, to build menu, so the use of ScreenManager was explained to at least two groups. Most of the end results consisted of interfaces done mainly in Kv, and some internal logic to display data, most group had a quite ambitious target, using geolocalisation, databases, complex interactions, and I wasn’t very optimistic on the odds of seeing them completed. Although I was right in that, I was still happy of the good designs they came up with, applications were incomplete (to a notable exception, will come back to that soon), but some interfaces were beautiful, reactive and engaging, so it was nice to see the magic happen in such a short time.

Floor2be

One group had a very different objective of the others, and although they had a difficult start, it turns out they were probably the best at teamwork, and had chosen a target they could actually achieve, a game! These motivated coders/artists came up with a classic 2D sidescroller, when the main character has to avoid elements on her way. Simple, to the point, and a quite a good realisation in such a short time, the fact that they created original artworks and integrated them in their game, and that the general theme had a nice touch of humour in the current political events in France certainly hearned them points, on top of having a completed project. They even could test it on Android during the competition time, and it was running perfectly. Their hard work earned them the right to run in a bigger international competition in the near future the angel hack in paris, next month, congratulation! I can only hope they’ll chose kivy as their secret weapon in this competion too.

The BoutinRun team at work

I would love to have better pictures, but i didn’t think much of taking them during the event, I should have better ones soon.