There won’t be any Kivy crash course videos for the next couple of weeks, as I won’t have the time or tools to make them. I haven’t stopped making them though, they’ll resume afterwards.
No Kivy crash course videos for a few weeks
There won’t be any Kivy crash course videos for the next couple of weeks, as I won’t have the time or tools to make them. I haven’t stopped making them though, they’ll resume afterwards.
Creating a Kivy layout: the SparseGridLayout
I thought for a change I’d try for a shorter post on a single quick
subject, so I’m going to quickly explain a simple Kivy layout I
created, the SparseGridLayout. The post is standalone, but would go
well with ideas from my Kivy Crash Course, especially the recent videos
trying to draw ideas together to make widgets or specifically focusing
on layouts.
The point here is that Kivy has a built in GridLayout, but it doesn’t cover all use cases for widgets in a grid, which is sometimes confusing to users who’ve seen grid widgets in other places and expected a slightly different behaviour. The problem is that the GridLayout fills widgets in from the top. That means for instance if there are 3 columns, you can’t place a widget in the third row without first adding 6 widgets to fill the first two rows. That’s just inefficient and wasteful if all you wanted was a small number of widgets in a grid.
So, my SparseGridLayout is a very simple layout that has a number of rows or columns, and checks its children for a row and column property. It then resizes them automatically to be placed in the right grid cell. That means we don’t need any extra widgets, which is much more efficient if we want a grid with not many entries, hence sparse grid layout.
We can start with a FloatLayout base, then all we need to do is set
our grid children’s size_hint and pos_hint properties
appropriately for the grid and call the FloatLayout‘s normal layout
method to actually place them in the grid positions/shapes for us.
We can start by making our layout class:
from kivy.uix.floatlayout import FloatLayout
from kivy.properties import NumericProperty, ReferenceListProperty

class SparseGridLayout(FloatLayout):
    rows = NumericProperty(1)
    columns = NumericProperty(1)
    shape = ReferenceListProperty(rows, columns)
That creates a basic class that doesn’t have any more actual behavior
than the FloatLayout alone, but has a few new properties. It’ll
hopefully all make sense if you’ve used Kivy a little or followed my
crash course, though the ReferenceListProperty may be new - this
takes multiple other properties and lets us access them as a list, so
for instance referencing or setting shape[0] really updates the
rows property, including calling all its associated events etc.. At
the same time, the shape is also a real property, with its own
events. Do experiment with this if the explanation is not clear.
Now, to make our layout actually rearrange its children to the grid,
we need to override its do_layout method, which is what’s called
whenever it or its children are updated.
def do_layout(self, *args):
    shape_hint = (1. / self.columns, 1. / self.rows)
    for child in self.children:
        child.size_hint = shape_hint
        if not hasattr(child, 'row'):
            child.row = 0
        if not hasattr(child, 'column'):
            child.column = 0

        child.pos_hint = {'x': shape_hint[0] * child.row,
                          'y': shape_hint[1] * child.column}
    super(SparseGridLayout, self).do_layout(*args)
This iterates over all the SparseGridLayout‘s children, setting their
size_hint so that they’ll fit exactly in a grid cell (as per the
rows and columns properties we set above). It then checks if
they have a row or column property, setting it to 0 if not - I’ve
chosen that my rows and columns should be zero-indexed, you could
modify that if you like. After that, it sets their pos_hint such
that they’re placed in the right place. I’ve deliberately let this
work with floats, so for instance they could be in column 2.5 to be
halfway between the integer columns, so the layout is extra flexible.
The final step is calling the original do_layout method of the
FloatLayout. The magic is that all we did is set the child widgets
size_hint and pos_hint so that the widgets align to a grid - the
FloatLayout itself already knows how to actually set their positions
and sizes based on this information. By making use of Kivy’s existing
layout abilities, we’ve saved ourself a lot of work.
Finally, I also added a class to represent entries in the grid:
class GridEntry(EventDispatcher):
    row = NumericProperty(0)
    column = NumericProperty(0)
This is very simple, but it means you can do for example:
class GridLabel(Label, GridEntry):
    pass
The GridLabel is thereby a Label that already has row and column
properties, so it will behave properly in our SparseGridLayout. We
don’t strictly need to do this, we could add the row and column
any other way, but this is neat and makes it totally clear what we’re
using our widgets for.
That’s everything! With just a few simple modifications we’ve made a whole new Layout widget that can place its children in rows and columns of a grid. Maybe you’ll find that useful, but more generally I hope this demonstrates the general principles of thinking about Layouts and using Kivy’s existing mechanisms to do most of the work.
You can find all this code at my sparsegridlayout github repository, which also includes a simple demonstration App so you can test the new layout if you like.
Using Facebook SDK with Python-for-Android / Kivy
For another museum project, Arnaud asked me to see if we could integrate Facebook in an app on Android. The usual libraries are made for desktop, and manually open a webbrowser to handle the user authorization. But that’s not really nice for us, it would be nicer to have a native integration instead. Let’s see how we can use the official Facebook Android SDK.
Prerequisites
You’ll need to have:
– Kivy’s python-for-android
– A Facebook account (obviously)
– Facebook SDK 3.0
Get the example
Clone the Kivy/Facebook example:
$ git clone https://github.com/tito/p4a-facebook-example
Register a Facebook application
- Go to the Facebook developers interface
- Click on

- Fill the information “App Name”. Don’t put “FB” or “Facebook” in the title, or your application name will be considered as Invalid

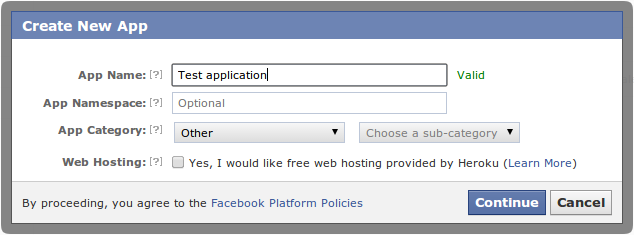
- Pass the captcha
- Write down your application id somewhere

- Now, you need to activate Native Android App. The package name is the same name as the one we will pass in
--packagewhen building the APK. The Class Name is thepackagename/activity. Activity class is always the same for all the applications compiled with python-for-android.
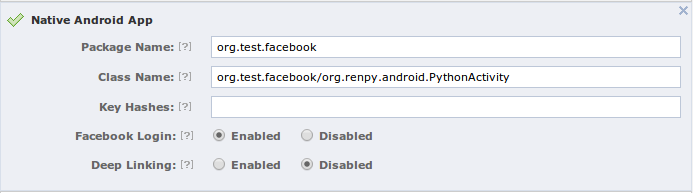
- Right now, the Facebook Android SDK will not authorize our android application to be used, because Facebook want to know the signature hash that will be used by our generated APK. To generate the key hashes, you need to use the keytool. Here is an example for the android “debug” key:
$ keytool -exportcert -alias androiddebugkey \
   -keystore ~/.android/debug.keystore | \
   openssl sha1 -binary | openssl base64
Enter keystore password:  android
u+bzQmG87L298C4KGM8yODi3W/4=
Copy the generated key hash, and paste it to the field:
Setup the our application
- Go into
p4a-facebook-example, and edit themain.py - Search for
FACEBOOK_APP_ID, and replace with your own Application Id - Go into python-for-android, and create a distribution:
$ ./distribute.sh -m 'kivy'
- Go into the
dist/default - Generate the APK one time (for generating all the file we need to customize). Replace
/path/to/p4a-facebook-example:./build.py --name "Facebook test" --package org.test.facebook \ --version 1 --private /path/to/p4a-facebook-example/ \ --window --permission INTERNET debug
- Add a new reference to
project.propertiesto include the Facebook SDK. The path to the Facebook SDK MUST be a relative path, otherwise you’ll get issues during the next build.android.library.reference.1=../../facebook-android-sdk-3.0.2/facebook
- Edit the
templates/AndroidManifest.tmpl.xmlto include the Facebook login activity, just under the<application>:<application android:label="@string/appName" android:icon="@drawable/icon"> <activity android:name="com.facebook.LoginActivity"/>
- Rebuild your application… and you’re ready to test
- Install the application on your device:
adb install -r bin/Facebooktest-1-debug.apk
Test your application
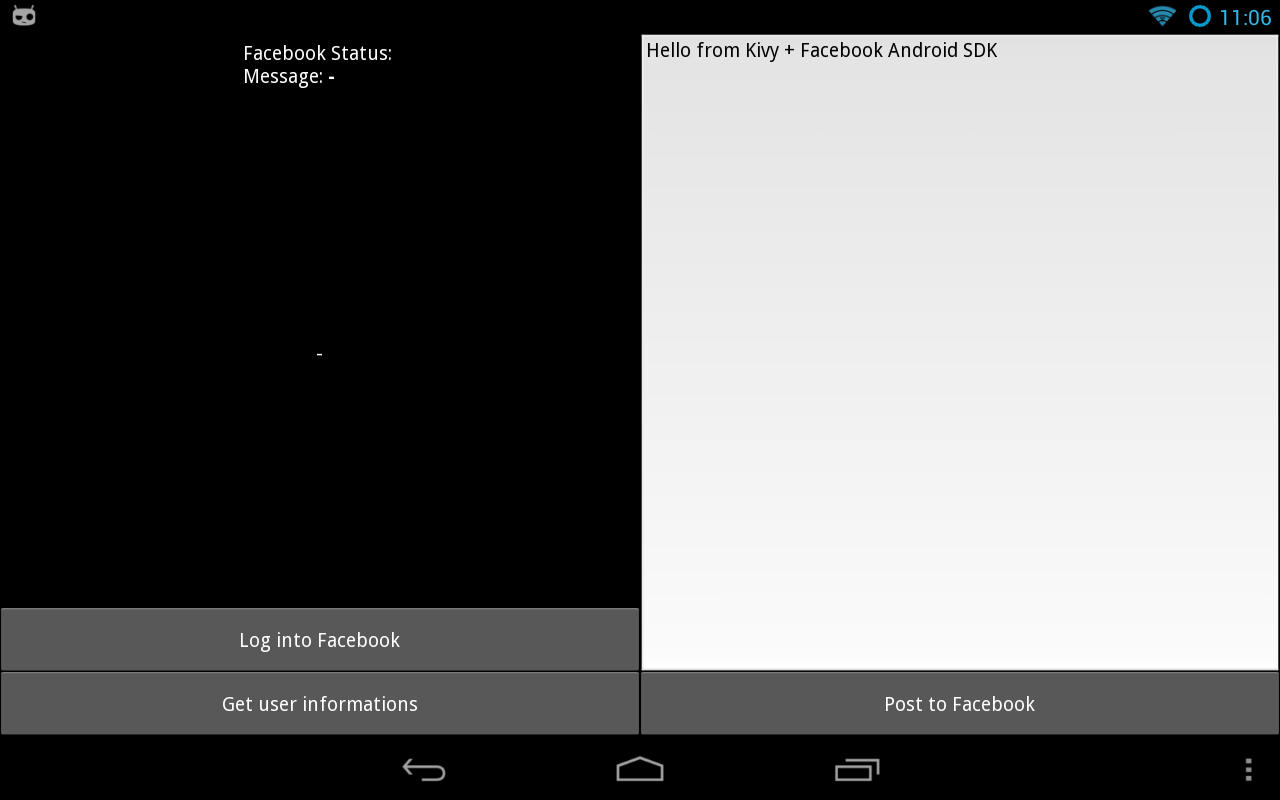
The Facebook SDK 3.0 require to separate read and publish permissions. To the user, it means you’ll have 2 dialog to accept. Even if you just want to publish to the application stream, you need to have the basic permission (read) accepted by the user before publish permissions. This is already implemented in the example app.
When you start the application the first time, you’ll have:
Depending if you have the Native Facebook application or not, you’ll have 2 kinds of authentification boxes.
Without Facebook installed on the device:

And with Facebook installed on the device:

After authentication, the user will need to accept our permissions:

It’s done!
The application have now the right to post The example post in the user stream as the application itself, not as the user. It’s called “publish_actions”.
Getting further
Obviously, when you use the Facebook SDK itself, you feel the pain of an API designed for Java. For every callback that Facebook want to call, you need to implement a Java class and define the callback method. Python is really simpler and fun to use.
See for yourself: we want to make a call of “Request.newStatusUpdateRequest“. Se weed first to implement a GraphUserCallback class, in Java. Thanks to Pyjnius, we can do it directly in Python:
class _FacebookGraphUserCallback(PythonJavaClass):

    __javainterfaces__ = ['com.facebook.Request$GraphUserCallback']
    __javacontext__ = 'app'

    def __init__(self, callback):
        self.callback = callback
        super(_FacebookGraphUserCallback, self).__init__()

    @java_method('(Lcom/facebook/model/GraphUser;Lcom/facebook/Response;)V')
    def onCompleted(self, user, response):
        self.callback(user, response)
This Python/Java class will call our own python callback when the Java callback onCompleted will be called. Then:
@run_on_ui_thread
    def post(self, text, callback):
        req = Request.newStatusUpdateRequest(
                self._session, text, _FacebookRequestCallback(callback))
        req.executeAsync()
All you have to do at the end, is to call the post method:
def fb_post(self, text):
        def callback(*args):
            from time import time
            self.post_status = 'message posted at {}'.format(time())
        self.facebook.post(text, callback=callback)
I don’t provide a wrapper around all the possible Request method you can do with Facebook. I just have an example for “post” and “me”. Both wrap “Request.newStatusUpdateRequest” and “Request.newMeRequest“. Please note that every request call must happen in the UI thread. Use the python-for-android/runnable module for that, with @run_on_ui_thread decorator.
The end
It was not easy to get it right, and it still complex to make all the pieces together. I’ve tried to use their own LoginButton (because they said that’s how they want it, everywhere), but i’ve not be able to use it in our app. Mostly because the LoginButton is a pure android widget, and because it doesn’t want to bring back the Activity after login. I was stuck too much time on it, and preferred to go in another way.
Please note that you should not share an application with a fake Facebook button, the design / look-and-feel must be the same as the original one.
I hope that will help some of you to get started !
Using Facebook SDK with Python-for-Android / Kivy
For another museum project, Arnaud asked me to see if we could integrate Facebook in an app on Android. The usual libraries are made for desktop, and manually open a webbrowser to handle the user authorization. But that’s not really nice for us, it would be nicer to have a native integration instead. Let’s see how we can use the official Facebook Android SDK.
Prerequisites
You’ll need to have:
– Kivy’s python-for-android
– A Facebook account (obviously)
– Facebook SDK 3.0
Get the example
Clone the Kivy/Facebook example:
$ git clone https://github.com/tito/p4a-facebook-exampleRegister a Facebook application
- Go to the Facebook developers interface
- Click on

- Fill the information “App Name”. Don’t put “FB” or “Facebook” in the title, or your application name will be considered as Invalid


- Pass the captcha
- Write down your application id somewhere

- Now, you need to activate Native Android App. The package name is the same name as the one we will pass in
--packagewhen building the APK. The Class Name is thepackagename/activity. Activity class is always the same for all the applications compiled with python-for-android.
- Right now, the Facebook Android SDK will not authorize our android application to be used, because Facebook want to know the signature hash that will be used by our generated APK. To generate the key hashes, you need to use the keytool. Here is an example for the android “debug” key:
$ keytool -exportcert -alias androiddebugkey \ -keystore ~/.android/debug.keystore | \ openssl sha1 -binary | openssl base64 Enter keystore password: android u+bzQmG87L298C4KGM8yODi3W/4=
Copy the generated key hash, and paste it to the field:

- Setup the our application
- Go into
p4a-facebook-example, and edit themain.py - Search for
FACEBOOK_APP_ID, and replace with your own Application Id - Go into python-for-android, and create a distribution:
$ ./distribute.sh -m 'kivy'
- Go into the
dist/default - Generate the APK one time (for generating all the file we need to customize). Replace
/path/to/p4a-facebook-example:./build.py --name "Facebook test" --package org.test.facebook \ --version 1 --private /path/to/p4a-facebook-example/ \ --window --permission INTERNET debug
- Add a new reference to
project.propertiesto include the Facebook SDK. The path to the Facebook SDK MUST be a relative path, otherwise you’ll get issues during the next build.android.library.reference.1=../../facebook-android-sdk-3.0.2/facebook
- Edit the
templates/AndroidManifest.tmpl.xmlto include the Facebook login activity, just under the<application>: - Rebuild your application… and you’re ready to test
- Install the application on your device:
adb install -r bin/Facebooktest-1-debug.apk
Test your application
The Facebook SDK 3.0 require to separate read and publish permissions. To the user, it means you’ll have 2 dialog to accept. Even if you just want to publish to the application stream, you need to have the basic permission (read) accepted by the user before publish permissions. This is already implemented in the example app.
When you start the application the first time, you’ll have:

Depending if you have the Native Facebook application or not, you’ll have 2 kinds of authentification boxes.

Without Facebook installed on the device:
And with Facebook installed on the device:

After authentication, the user will need to accept our permissions:

It’s done!
The application have now the right to post The example post in the user stream as the application itself, not as the user. It’s called “publish_actions”.
Getting further
Obviously, when you use the Facebook SDK itself, you feel the pain of an API designed for Java. For every callback that Facebook want to call, you need to implement a Java class and define the callback method. Python is really simpler and fun to use.
See for yourself: we want to make a call of “Request.newStatusUpdateRequest“. Se weed first to implement a GraphUserCallback class, in Java. Thanks to Pyjnius, we can do it directly in Python:
Python
class _FacebookGraphUserCallback(PythonJavaClass):

    __javainterfaces__ = ['com.facebook.Request$GraphUserCallback']
    __javacontext__ = 'app'

    def __init__(self, callback):
        self.callback = callback
        super(_FacebookGraphUserCallback, self).__init__()

    @java_method('(Lcom/facebook/model/GraphUser;Lcom/facebook/Response;)V')
    def onCompleted(self, user, response):
        self.callback(user, response)
This Python/Java class will call our own python callback when the Java callback onCompleted will be called. Then:
Python
@run_on_ui_thread
def post(self, text, callback):
    req = Request.newStatusUpdateRequest(
            self._session, text, _FacebookRequestCallback(callback))
    req.executeAsync()
All you have to do at the end, is to call the post method:
Python
def fb_post(self, text):
    def callback(*args):
        from time import time
        self.post_status = 'message posted at {}'.format(time())
    self.facebook.post(text, callback=callback)
I don’t provide a wrapper around all the possible Request method you can do with Facebook. I just have an example for “post” and “me”. Both wrap “Request.newStatusUpdateRequest” and “Request.newMeRequest“. Please note that every request call must happen in the UI thread. Use the python-for-android/runnable module for that, with @run_on_ui_thread decorator.
The end
It was not easy to get it right, and it still complex to make all the pieces together. I’ve tried to use their own LoginButton (because they said that’s how they want it, everywhere), but i’ve not be able to use it in our app. Mostly because the LoginButton is a pure android widget, and because it doesn’t want to bring back the Activity after login. I was stuck too much time on it, and preferred to go in another way.
Please note that you should not share an application with a fake Facebook button, the design / look-and-feel must be the same as the original one.
I hope that will help some of you to get started !
GRDevDay 2013 and My Kivy Talk
I was lucky enough to give a talk about Kivy – a multi-touch, cross-platform Python GUI and application framework – at GRDevDay 2013. Although my talk was the least-attended talk I went to all day, I enjoyed giving it and I got to meet a few new Python folks from Michigan. I’m going to chalk up the attendance to the fact that I was in the same time slot as a lot of good talks, including three that I wanted to see myself. Ah well, such are conferences. At any rate, it gave me an opportunity to see what worked and what didn’t in this talk so I can make some changes before I give it at MobiDevDay Detroit in May.

Watching the “So you think you know Javascript” talk at GRDevDay
For those interested, I’ve posted the slides from my Kivy talk to Speaker Deck, and you can find the tutorial as it existed for the talk in this repository on GitHub.
[Edit 2013-03-05]
There were a few questions I was unable to answer at my GRdevDay talk. As I find answers, I will post them here.
Question: Can you make Android widgets using Kivy?
Answer: Probably not, but there has been a lot of work in pyjnius. No one has tried it recently.
[Edit 2013-03-07]
In my talk I said that you have to specify Android permissions in the Manifest.xml file. This is incorrect, you specify the permissions as part of the build command. See the Python for Android docs for more information.
Crowdfunding Kivy on Raspberry Pi
Kivy doesn’t run yet on the Raspberry Pi, and we need your help to crowdfund it!
Even is Kivy is built to be compatible for GLES 2.0, we lack of a python EGL support.
The plan is to add a new EGL Window provider, in addition to the detection of non-multitouch devices such as keyboard and mouse.
All the informations are available at: https://www.bountysource.com/#fundraisers/143-kivy-on-raspberry-pi