Python on Android

There are an increasing number of resources about different ways of running Python on Android. Kivy (and its subprojects) are commonly mentioned, as one of the most mature and popular ways to do so, but one thing that gets less attention is the details of what you can do with Python itself once it’s running on the device - what are the limitations of this? Can we use any Python module? What about calling Android APIs, can we perform all of the functions of a Java application? These are all somewhat leading questions, they are things addressed by Kivy or its associated projects, and in this post I’ll summarise some of the most interesting and important details.

python-for-android

Before anything else, let’s look quickly at the tool Kivy actually uses to get Python on Android; the unimaginatively-named python-for-android project. The basic functionality of this tool is to first build a distribution, an Android project directory that includes all the components Kivy needs to run, compiled for Android by its NDK. This includes in particular the Python interpreter itself, plus Kivy and the libraries it depends on - currently Pygame and SDL amongst others, although we are working to modernise this bit. The distribution also includes a Java bootstrap, a normal app structure whose job is to display Kivy’s OpenGL surface and to mediate between Kivy and Android. All these components can then be bundled into an APK with the user’s Python script and different settings (icon, name, orientation etc.) to taste.

This is only the basic procedure, the APK can (and does) include much more than just these essentials. Amongst other things, most of the Python standard library is built in by default, and pure Python modules can be included easily so in general you can perform tasks using just the same libraries you would on the desktop. Libraries with compiled components are more complex, but can be built and included as long as python-for-android has a compilation recipe for them (or you provide your own) - these are often quite simple, just setting some compilation flags and running the normal build procedure, although some modules need additional patching. Python-for-android includes quite a few recipes by default, including very popular modules like numpy, sqlite3, twisted and even django!

The above is the basics of how python-for-android works but is far from the whole story, and you can check the documentation for more information about building your own APKs - in particular, we recommend using Buildozer, which gives python-for-android a more convenient interface and can manage some dependencies (in particular the Android SDK and NDK) automatically. This is also quite focused on Kivy itself, but we’re trying to move to make it easier for other projects to use the same toolchain - the core process of building and including Python should be similar, but there’s no need for the bootstrap app at the end to support only Kivy’s specific needs.

Calling Android APIs with PyJNIus

In normal Android application development, interaction with the Android API is an important part of how your app behaves - getting sensor data, creating notifications, vibrating, pausing and restarting, or just about anything else. Kivy takes care of the essentials for you, but many of these are things you’ll still want to manage yourself from Python. For this reason we have the PyJNIus project, also developed under the Kivy organisation, which automatically wraps Java code in a Python interface.

As a simple example, here’s the Python code to have an Android device vibrate for 10s:

from jnius import autoclass

# We need a reference to the Java activity running the current
# application, this reference is stored automatically by
# Kivy's PythonActivity bootstrap:
PythonActivity = autoclass('org.renpy.android.PythonActivity')
activity = PythonActivity.mActivity

Context = autoclass('android.content.Context')
vibrator = activity.getSystemService(Context.VIBRATOR_SERVICE)

vibrator.vibrate(10000)  # the argument is in milliseconds

If you’re familiar with the Android API, you’ll notice that this is very similar to the Java code you’d use for the same task; PyJNIus just lets us call the same API directly from Python. Most of the Android API can be called from Python in the same way, letting you achieve the same things as a normal Java application.

The main disadvantages of using PyJNIus directly are that it requires some understanding of how the Android API is structured, and that it is quite verbose - though the latter just reflects the nature of the equivalent Java code. For this reason, the Kivy project set includes Plyer.

Plyer: A platform-independent API for platform-specific features

The Plyer project takes a step back from the specific implementation details of individual platforms in order to try to create a simple, pythonic interface for a subset of (mostly) shared functionality. For instance, the vibration example above would become

from plyer.vibrator import vibrate
vibrate(10)  # in Plyer, the argument is in seconds

Further, Plyer is not just for Android but would try to do something appropriate on any of its supported platforms - currently Android, iOS, Linux, Windows and OS X (on iOS, PyOBJus fulfils a similar role to PyJNIus on Android). The vibrator is actually a bad example as only Android is currently implemented, but other APIs such as checking the battery (from plyer import battery; print(battery.status)) or text-to-speech (from plyer import tts; tts.speak('hello world')) would already work on both desktop and mobile devices, and others such as the compass or gyroscope sensors or sending SMS messages would work on both Android and iOS.

Plyer is very much under development, with new API wrapper contributions very welcome, and is the subject of a (second) GSoC project this year. We hope that it will become increasingly feature-complete.

Not just for Kivy

All of these tools have been shaped in their current form by the needs of Kivy, but are really more generic Python tools; Plyer specifically avoids any Kivy dependency, and PyJNIus only makes an assumption about how to access the JNI environment on Android. We hope that these tools can be more generally useful to anyone running Python on Android; for instance, you can already experiment with PyJNIus using the QPython Android app. Python-for-android is more tied to Kivy’s current toolchain but this is a detail under review, and we’re happy to discuss the details of Android compilation with anyone interested.

Overall, a lot is possible with Python on Android, despite how different the Python environment is to the Java development that is directly targeted. But there’s much more that could be done - if you’re interested, now is a great time to dive in!
Kivy 1.9 released

Kivy 1.9 has just been released! This has been a long time in the making, for no very good reason, but now you can take advantage of all our many new features in the stable branch. You can find the full changelog at the official mailing list announcement.

This big release includes almost 2500 new commits (about 30% of the total in Kivy!) from nearly 100 different contributors, including both significant changes and many smaller fixes. I’ll showcase a few of the most interesting ones below; these are also listed in the changelog above, along with more information about the many other changes.

One of the most major internal changes is a shift to using SDL2 as our window and other backend provider on almost all platforms - only Android still uses the old pygame/SDL backend. This shouldn’t change the external user API at all, but directly makes available features that Pygame lacked such as proper support for high-DPI displays and the ability to retain an OpenGL context on resize (previously lacking in Windows and OS X), as well as resolving some old Pygame related bugs and hopefully making further low level customisation easier in the future. Although this doesn’t change at all how you interact with Kivy, it’s a big improvement behind the scenes. This also means that Pygame is now deprecated on platforms where SDL2 already works; we’ll continue to support it for a while and it’s unlikely to stop working even after that, but it’s no longer a focus.

Image of Kivy on a retina display with high DPI mode

Image of Kivy on a retina display without high DPI mode

These images show the difference in Kivy rendering on the same (OS X retina) screen, first with the new SDL2 high DPI mode enabled so that Kivy has full awareness of the true resolution, and second letting the operating system scale up a smaller rendered result - the latter is default for applications that do not declare DPI awareness, but Kivy will now always render properly as in the first image. The difference is dramatic, and we’re glad to be able to properly support these resolutions. This improvement is currently enabled only on OS X, but the equivalent Windows fix will be merged shortly and the behaviour should already be correct on Linux.

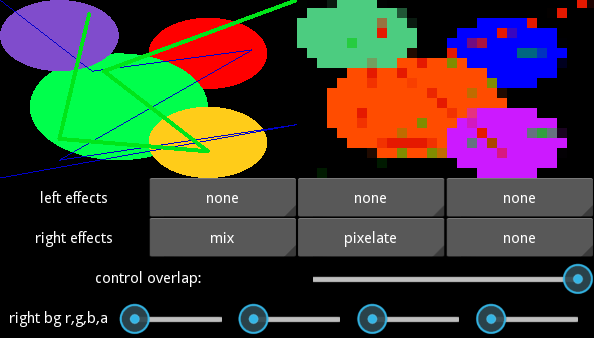
A different change that may be more directly useful in your applications is the new EffectWidget, which behaves as a normal RelativeLayout but also lets you add one or more shader effects to its rendered output. The API is designed to make it very easy to create simple effects even without knowing about GLSL, in a way that can easily be combined with existing applications.

Image of Kivy effectwidget

This above screenshot demonstrates the EffectWidget via one of the new Kivy examples; the kv code of the left and right is identical, except the right hand side includes colour mixing and pixelation effects. Since these are applied at a very low level they are very efficient (although not optimised for too many effects at once) and can be applied even to video or moving scenes such as in games.

Image of the Kivy SVG example, including the famous svg tiger

One feature that has been heavily requested by users is SVG support for Kivy, and preliminary support is included in 1.9! This is still experimental and currently supports only Python 2, but much of the work has been done and even complex SVG images are reproduced well. The above image shows one of the new SVG examples, including the famous tiger.

There are also some nice new features that can’t be captured so easily in a screenshot. One is the addition of a rebind option to Kivy properties. This resolves a problem that arose with code like

# In python
from kivy.uix.button import Button
from kivy.properties import ObjectProperty
class MyButton(Button):
    some_ref = ObjectProperty(None, rebind=True)

# And in kv language
<MyButton>:
    text: self.some_ref.text if self.some_ref else ''

The problem here was that kv could only bind automatically to the first value of self.some_ref, so the text of the MyButton instance would never update, and it is difficult to improve this internally without dramatic slowdowns from checking if many objects have changed. The new rebind option makes it possible to enable this second level of binding in select places where appropriate; it won’t be necessary or useful to everyone, but it’s a convenient feature when really necessary.

Other new features include a new, faster video provider via Cython and ffmpeg, Window modes to detect and react to the presence of a software keyboard on Android, an internal rewiring of focus handling for widgets, and many many other bugfixes and smaller new features.

Thanks to all our contributors, and enjoy the new release!

Kivy in GSOC 2015

Kivy will be participating in the Google Summer of Code 2015 (GSOC), under the Python Software Foundation umbrella. Applications are welcomed not just for the Kivy framework itself but on all the projects managed by the Kivy organisation including Python-for-Android, Kivy-iOS, PyJNIus, PyOBJus, Plyer and Buildozer. As such, GSOC projects can range in focus and difficulty from those that should be accessible to intermediate Python users to low level work making use of Cython, or interacting with Java and Objective C on mobile platforms.

Our page of GSOC information and suggested projects is available here and includes ideas touching all of these areas. However, these are just guidelines and suggestions; if you have a different idea, we’re happy to discuss it. Prospective GSOC students should introduce themselves on the kivy-dev mailing list, and also say hello on our IRC channel, discussions there will be an important part of any application.

Beyond that, check out the project page linked above, and good luck with your applications.

Hy (lisp) and Kivy

I was recently reminded of the super cool Hy project. Hy is a lisp that compiles to python’s own abstract syntax tree, so it works perfectly with existing Python code (including with Cython etc.) but also exposes all the power of lisp.

For instance, here’s a simple Kivy application that simply displays a Label with the obligatory Hy pun, but written in Hy. I’ve included the normal Python code as comments so you can see exactly what the code is doing. If you’re new to Kivy and want to understand what the code actually does, check out my Kivy crash course:

(import [kivy.app [App]]
        [kivy.uix.label [Label]])
;; from kivy.app import App
;; from kivy.uix.label import Label


(defclass HyApp [App]
  [[build
    (fn [self]
      (apply Label [] {"text" "Hy world!"
                       "font_size" 100
                       "color" (, 0 1 0 1)}))]])

;; class HyApp(App):
;;     def build(self):
;;         return Label(text="Hy world!",
;;                      font_size=100,
;;                      color=(0, 1, 0, 1))

(.run (HyApp))

;; HyApp().run()

This works great, though only with python3 due to a small bug in Kivy - the kwargs of Label are eventually read in cython with a variable typed as str, which in python2 excludes the unicode Hy passes. Still, that’s not surprising even if it’s cool - part of the point of Hy is to interoperate perfectly with Python.

A tougher problem is how to use Kivy’s kv language with Hy. kv is a simple domain-specific language for declaring widget trees, making it easy to define event-driven interactions between the different properties of widgets. It’s really useful and we tend to recommend using it as much as possible, so it’d be great to have it work with Hy. I won’t explain the language here (you can see the Kivy doc or my own tutorials), but the key point is that much of it consists of interpreting normal python code, which I’d like to replace with Hy code.

It turns out making this work is actually really easy. Here’s the relevant part of lang.py in Kivy’s source, the file containing the code for the kv parser:

self.co_value = compile(value,
                        self.ctx.filename or '<string>',
                        mode)

value is the string of Python code whose output will set a property of a widget or be run when an event is registered. For instance, a line of kv code might be color: (1, 0, 0, some_function_of(self.alpha)), in which case value would be "(1, 0, 0, some_function_of(self.alpha))".

To make a line of Hy code work instead of Python, we can do an awful hack, replacing the above line with:

if value[-3:] == '#hy':
    from hy.importer import (ast_compile,
                             import_buffer_to_ast)
    from hy.compiler import hy_compile
    import ast
    ast_part = import_buffer_to_ast(value[:-3], '<stdin>')
    if mode == 'eval':
        ast_part = ast.Expression(ast_part.body[0].value)
    self.co_value = ast_compile(ast_part,
                                self.ctx.filename or '<string>',
                                mode)
else:
    self.co_value = compile(value,
                            self.ctx.filename or '<string>',
                            mode)

This new code checks if the line of Python ends with #hy, and if so runs the code through Hy’s own equivalent of compile (effectively parsing the Hy code to ast before doing the same thing as the normal Python code). I also have the extra muckiness of taking apart this ast if the compilation is in eval mode, because I couldn’t get Hy to return an ast.Expression in the first place. This is probably very easily and neatly fixed, but I’ve left it like this because a silly hack is good enough for a proof of concept. All credit for this part goes to the friendly Hy people on their irc channel, #hy on Freenode.

With this in place, we can write a new Python program, but this time use our Hy+kv language to define the widget tree. Here’s the new code on the Python (now Hy) side:

(import [kivy.app [App]]
        [kivy.lang [Builder]])

;; from kivy.app import App
;; from kivy.lang import Builder

(setv root (Builder.load_file "hy.kv"))

;; root = Builder.load_file("hy.kv")

(defclass HyApp [App]
  [[build
    (fn [self]
      root)]])

;; class HyApp(App):
;;     def build(self):
;;         return root

(.run (HyApp))

;; HyApp().run()

This obviously depends on our new kv file, “hy.kv”, whose contents are as below. Kivy users will notice this file would normally be loaded automatically because the app name starts with Hy, but something about Hy seems to have broken this so I manually loaded it with the Builder.

BoxLayout:
    orientation: "vertical"
    Label:
        id: label
        text: "What is your name?"
    TextInput:
        id: ti
        text: ""
    Button:
        text: (.format "Greet me as {}" ti.text) #hy
        on_press: (setv label.text (.format "Hy there {}" ti.text)) #hy

# as normal kv, except the final 2 rules would normally be:
# text: "Greet me as {}".format(ti.text)
# on_press: label.text = "Hy there {}".format(ti.text)

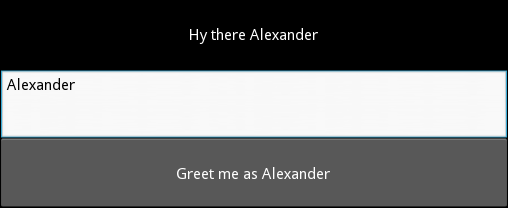
Running the code…it works perfectly! Here’s a picture after typing my name and clicking the button:

Image of Kivy program after running Hy code

For those not familiar with kv, one of its features is that it automatically detects property changes and updates dependent properties - in this case, the text of the button should change every time ti.text changes (i.e. every time a letter is typed in the TextInput). This works too with the new Hy interface, because the parser detects the dependency by searching the string for substrings like ti.text, and these have been unmodified by the move to Hy. Hy does support syntax that would break this relationship, but it’s quite convenient as it is.

So…there we go, Hy support in Kivy! The hack to make kv language work is pretty terrible, but it looks like a proper solution with this basis would work fine - we could subclass the kv parsing Builder to support a Hy loading option, removing the need for the #hy at the end of each Hy line.