Central themes: Modifying Widget appearance, Kivy properties
It’s great to say Hello World, but it looks pretty boring, and you’d expect that you’d be able to customise the appearance of text. Fortunately, you’d be right…so let’s do it.
We’ll continue modifying the code from last time, which was:
from kivy.app import App
from kivy.uix.label import Label

class YourApp(App):
    def build(self):
    root_widget = Label(text='Hello world!')
    return root_widget

YourApp().run()
The basic way to modify things in Kivy is to change Kivy properties of the widgets. As far as we’re concerned right now, we can set these by passing arguments at instantiation, or by treating them as attributes of the class. For instance, we could also have set the text as follows:
root_widget = Label()
root_widget.text = 'Hello world!'
Let’s set ourselves three goals:
- Make the text larger
- Italicise the text
- Colour "Hello" and "world!" differently
To customise the Label appearance, we must check the documentation to find an appropriate Kivy property. For the text size, check the Label doc and find the font_size listing. It looks something like the following:

Following the documentation, this lets us set the font size in pixels, and it defaults to '15sp'. This is a special Kivy syntax, the sp units automatically scale the font size according to the DPI of the display and the user’s font size setting (on some platforms); on desktop on a non-hidpi display, it is just 15 pixels. For now let’s just set a simple pixel number:
root_widget = Label(
    text='Hello world!',
    font_size=100)
You can run the code now to see the result.
To make the text italic, the procedure is the same. Check the Label doc and find the italic property entry. you’ll see that this is a BooleanProperty that defaults to False; just set it to True to enable the underline:
root_widget = Label(
    text='Hello world!',
    font_size=100,
    italic=True)
Finally, we want to colour Hello and world! differently. Things are a little different here as we can’t use a single property setting to modify the whole string, since the two words should be treated differently.
Instead we enable the markup property:
root_widget = Label(
    text='Hello world!',
    font_size=100,
    underline=True,
    markup=True)
You can now use Kivy’s markup syntax to modify the text within the Label. Try the following:
root_widget = Label(
font_size=100,
italic=True,
markup=True)
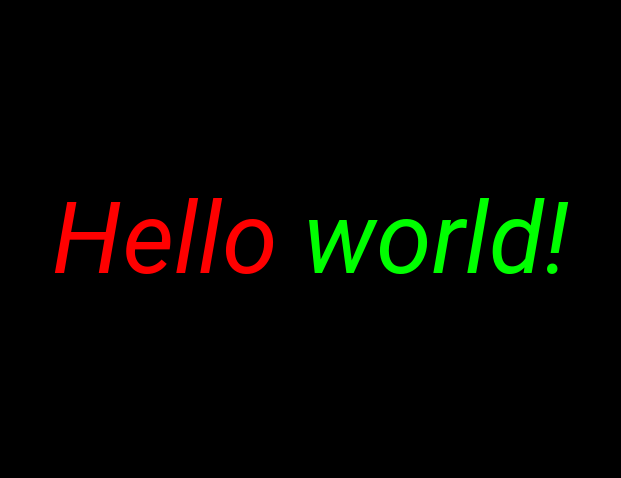
root_widget.text = '[color=#ff0000]Hello[/color] [color=#00ff00]world![/color]'
Now run the application again, python your_filename.py. The result should now look something like the following image.
Note
This is just a basic introduction to customising Kivy widgets, you can use similar methods to accomplish many different changes in many different scenarios. Kivy properties also have other important functionality, covered later in these tutorials.
Full code
The full code for this exercise was:
from kivy.app import App
from kivy.uix.label import Label

class YourApp(App):

    def build(self):
        root_widget = Label(
            font_size=100,
            italic=True,
            markup=True)
        root_widget.text = '[color=#ff0000]Hello[/color] [color=#00ff00]world![/color]'
        return root_widget

YourApp().run()