I was recently reminded of the super cool Hy project. Hy is a lisp that compiles to python’s own abstract syntax tree, so it works perfectly with existing Python code (including with Cython etc.) but also exposes all the power of lisp.
For instance, here’s a simple Kivy application that simply displays a Label with the obligatory Hy pun, but written in Hy. I’ve included the normal Python code as comments so you can see exactly what the code is doing. If you’re new to Kivy and want to understand what the code actually does, check out my Kivy crash course:
(import [kivy.app [App]]
        [kivy.uix.label [Label]])
;; from kivy.app import App
;; from kivy.uix.label import Label


(defclass HyApp [App]
  [[build
    (fn [self]
      (apply Label [] {"text" "Hy world!"
                       "font_size" 100
                       "color" (, 0 1 0 1)}))]])

;; class HyApp(App):
;;     def build(self):
;;         return Label(text="Hy world!",
;;                      font_size=100,
;;                      color=(0, 1, 0, 1))

(.run (HyApp))

;; HyApp().run()
This works great, though only with python3 due to a small bug in Kivy - the kwargs of Label are eventually read in cython with a variable typed as str, which in python2 excludes the unicode Hy passes. Still, that’s not surprising even if it’s cool - part of the point of Hy is to interoperate perfectly with Python.
A tougher problem is how to use Kivy’s kv language with Hy. kv is a simple domain-specific language for declaring widget trees, making it easy to define event-driven interactions between the different properties of widgets. It’s really useful and we tend to recommend using it as much as possible, so it’d be great to have it work with Hy. I won’t explain the language here (you can see the Kivy doc or my own tutorials), but the key point is that much of it consists of interpreting normal python code, which I’d like to replace with Hy code.
It turns out making this work is actually really easy. Here’s the relevant part of lang.py in Kivy’s source, the file containing the code for the kv parser:
self.co_value = compile(value,
                        self.ctx.filename or '<string>',
                        mode)
value is the string of Python code whose output will set a property of a widget or be run when an event is registered. For instance, a line of kv code might be color: (1, 0, 0, some_function_of(self.alpha)), in which case value would be "(1, 0, 0, some_function_of(self.alpha))".
To make a line of Hy code work instead of Python, we can do an awful hack, replacing the above line with:
if value[-3:] == '#hy':
    from hy.importer import (ast_compile,
                             import_buffer_to_ast)
    from hy.compiler import hy_compile
    import ast
    ast_part = import_buffer_to_ast(value[:-3], '<stdin>')
    if mode == 'eval':
        ast_part = ast.Expression(ast_part.body[0].value)
    self.co_value = ast_compile(ast_part,
                                self.ctx.filename or '<string>',
                                mode)
else:
    self.co_value = compile(value,
                            self.ctx.filename or '<string>',
                            mode)
This new code checks if the line of Python ends with #hy, and if so runs the code through Hy’s own equivalent of compile (effectively parsing the Hy code to ast before doing the same thing as the normal Python code). I also have the extra muckiness of taking apart this ast if the compilation is in eval mode, because I couldn’t get Hy to return an ast.Expression in the first place. This is probably very easily and neatly fixed, but I’ve left it like this because a silly hack is good enough for a proof of concept. All credit for this part goes to the friendly Hy people on their irc channel, #hy on Freenode.
With this in place, we can write a new Python program, but this time use our Hy+kv language to define the widget tree. Here’s the new code on the Python (now Hy) side:
(import [kivy.app [App]]
        [kivy.lang [Builder]])

;; from kivy.app import App
;; from kivy.lang import Builder

(setv root (Builder.load_file "hy.kv"))

;; root = Builder.load_file("hy.kv")

(defclass HyApp [App]
  [[build
    (fn [self]
      root)]])

;; class HyApp(App):
;;     def build(self):
;;         return root

(.run (HyApp))

;; HyApp().run()
This obviously depends on our new kv file, “hy.kv”, whose contents are as below. Kivy users will notice this file would normally be loaded automatically because the app name starts with Hy, but something about Hy seems to have broken this so I manually loaded it with the Builder.
BoxLayout:
    orientation: "vertical"
    Label:
        id: label
        text: "What is your name?"
    TextInput:
        id: ti
        text: ""
    Button:
        text: (.format "Greet me as {}" ti.text) #hy
        on_press: (setv label.text (.format "Hy there {}" ti.text)) #hy

# as normal kv, except the final 2 rules would normally be:
# text: "Greet me as {}".format(ti.text)
# on_press: label.text = "Hy there {}".format(ti.text)
Running the code…it works perfectly! Here’s a picture after typing my name and clicking the button:
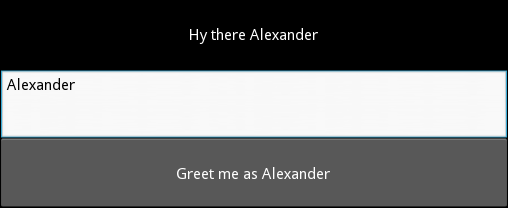
For those not familiar with kv, one of its features is that it automatically detects property changes and updates dependent properties - in this case, the text of the button should change every time ti.text changes (i.e. every time a letter is typed in the TextInput). This works too with the new Hy interface, because the parser detects the dependency by searching the string for substrings like ti.text, and these have been unmodified by the move to Hy. Hy does support syntax that would break this relationship, but it’s quite convenient as it is.
So…there we go, Hy support in Kivy! The hack to make kv language work is pretty terrible, but it looks like a proper solution with this basis would work fine - we could subclass the kv parsing Builder to support a Hy loading option, removing the need for the #hy at the end of each Hy line.