Texture compression, why does it matter ?

We all care about cash, time, life, love, and if you’re doing computer graphics, you might care about the memory consumption of your graphics card. Why ? For the same reason when you running out of cash :)

I’ll explain why does it matter to compress texture, and compare available possibilities. My personnal goal is to be able to load a lot of FULL HD pictures on tablet, for a museum project. The analysis is focused on DXT1 compression and size. I’m looking forward to ETC1 and will update that blog post with the result in the future.

What are we dealing with

If you are doing an application that display lot of hd pictures, that’s matter. We’ll start from this simple math statement: a full HD picture is 1980×1020 with 4 channels (RGBA). Whatever if your pictures is in PNG, or JPEG, your graphics card is not able to understand it, and will store it in its memory decompressed. So this image will eat:

1920 x 1080 x 4 = 8294400 bytes = 7.91MB
1920 x 1080 x 4 + mipmaps = 10769252 bytes = 10.27MB

In theory. Because it might be more if your graphics card doesn’t support NPOT texture. If not, usually, the texture will be resized to the closest POT texture available, mean for us: 2048 x 2048. Then the size for POT will be:

2048 x 2048 x 4 = 16777216 bytes = 16MB
2048 x 2048 x 4 + mipmaps = 22369620 bytes = 21MB

Compressions types

They are plenty types of compression availables. The most common are S3TC (including DXT1, DXT3, DXT5) from Savage3 originally, LATC from Nvidia, PVRTC from PowerVR, ETC1 from Ericsson…

Not all of them are available everywhere, and it’s depending a lot from your hardware. Here is a list of tablet / vendor / texture compression available. (only tablet, not desktop computer.) Thanks to this stackoverflow thread about supported OpenGL ES 2.0 extensions on Android devices

Tablette Vendor DXT1 S3TC LATC PVRTC ETC1 3DC ATC
(desktop computer) GeForce GTX 560 NVIDIA X X X
Motorola Xoom NVIDIA X X X X
Nexus One Qualcom X X X
Toshiba Folio NVIDIA X X X X
LGE Tablet NVIDIA X X X X
Galaxy Tab PowerVR X X
Acer Stream Qualcomm X X X
Desire Z Qualcomm X X X
Spica Samsumg X X
HTC Desire Qualcomm X X X
VegaTab NVIDIA X X X X
Nexus S PowerVR X X
HTC Desire HD Qualcomm X X X
HTC Legend Qualcomm X X X
Samsung Corby Qualcomm X X X
Droid 2 PowerVR X X
Galaxy S PowerVR X X
Milestone PowerVR X X

We are seeing that ETC1 is standard compression for OpenGL ES 2, unfortunately, it will not work on desktop.
PVRTC is specific to PowerVR device: it’s a standard on Ipad/Iphone.

Using DXT1

If you use DXT1, you need a POT image. DXT1 doesn’t work on NPOT.

To convert any image to DXT1 without any tool, you must know that your graphics card is capable of doing it, using specials opengl functions. But i wanted to precalculate them.
Nvidia texture tools contains tools for converting them, but you need an Nvidia card. For all others, you might want to look at Libsquish. It’s designed to compress in software a raw image to DXTn.
The result will be not a DXT1 “file”, because DXT1 is the compression format. The result will be stored in a DDS file, that we’ll see later about it.

If you want to be able to use libssquish in Python, you might want to apply my patch available on their issue tracker

For DXT1, the size of the file is not depending of the image content:

DXT1 2048x2048 RGBA = 2097152 bytes = 2MB

That’s already a big improvement. DXTn is able to store mipmaps of the texture too. For this size, the calculation is:

DXT1 2048x2048 RGBA + mipmap = 2795520 bytes = 2.73MB

Comparaison table

Type Resolution File size GPU size Images in a 256MB GPU Images in a 512MB GPU
Raw RGBA image (POT) 2048 x 2048 - 16384KB 16 32
PNG image (NPOT) 1920 x 1080 4373KB 8040KB 32 65
PNG Image in reduced POT resolution 1024 x 1024 1268KB 4096KB 64 128
DXT1 without mipmap 2048 x 2048 2048KB 2048KB 128 256
DXT1 without mipmap, reduced 1024 x 1024 512KB 512KB 512 1024
DXT1 with mipmap 2048 x 2048 2730KB 2730KB 96 192
DXT1 with mipmap, reduced 1024 x 1024 682KB 682KB 384 768

As soon as we use compression, what we see is:

  1. The file size is the same as GPU size
  2. Even with POT texture compared to NPOT dxt1, we can still store 4x more images in GPU

And with Kivy ?

DXT1 itself is the compression format, but you cannot actually use it like that. You need to store the result is a formatted file. DDS.

Kivy is already able to read DDS files. But you must ensure that your graphics card is supporting DXT1 or S3TC. Look at gl_has_capability() function in Kivy then.
Kivy at EuroPython – Lightning explanation


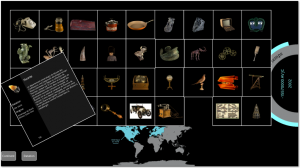
For all the guys that was interested about Kivy lightning talk at EuroPython 2011, due to some incomprehension about what is Kivy, here is a lightning explanation to make it clear.

Kivy is a Python framework designed for creating of Natural Users Interfaces. The framework containing abstraction for loading image, video, audio. It have a complete new approach about input events, and widgets. For example, you can use lot of widgets at the _same_ time, something not really possible in classical framework (qt, gtk…): try to touch on a button while selecting something in a list. This is not only about multitouch for one user, but also for multi users. Kivy graphics engine is in OpenGL ES2, and all the widgets are using it.

If you write an application in top of Kivy, you can deploy it on Linux, MacOSX, Windows and Android. Without changing anything in your code. Because it’s in Python.

The presentation tool i’ve used is PreseMT. It have been made by Christopher and Me. And it’s an application built using Kivy. A version of this tool is already published on Android Market.
PreseMT have been written in one week, and use lot of Kivy features. But it’s still not finished, and we are missing lot of features, like the ability to export the presentation in a “good” format. We have plan to make an export in HTML5, that will support animation too.

Feel free to follow me on @mathieuvirbel !

Recording OpenGL output to H264 video

Apitrace is a tool for recording all the gl commands in a trace file. The trace file can be replay in later time, and they got a nice gui for checking all the gl call every frame, with introspection. They have a glretrace software that replay a trace file. We can use it to get the output of everyframe and push it in a gstreamer pipeline to make a video.

Why not using gtkRecordMyDesktop or other screen capture ? Sometime, the overhead of capturing and encoding video on live take too much CPU. And the application start to slow down. I didn’t see any slowdown using apitrace, and the trace file is very small compared to video output or raw video output.

So first, compile apitrace with stdout support:

$ git clone git://github.com/tito/apitrace.git
$ cd apitrace
$ git checkout snapshot-stdout
$ mkdir build
$ cd build
$ cmake ..
$ make

Take any opengl application, and make a trace file. The trace file will have the name of the binary. In my case, python is an alias to python2.7: the trace file will be python2.7.trace.

$ LD_PRELOAD=./glxtrace.so python ~/code/kivy/examples/demo/pictures/main.py
# replay for fun now
$ ./glretrace python2.7.trace

To be able to make a video from the trace file, you need to know the size of the window, and the initial framerate. Here, my example is running at 800×600, 60fps:

$ ./glretrace -sr python2.7-trace | \
  gst-launch fdsrc ! \
  videoparse width=800 height=600 format=rgbx framerate=60 ! \
  videoflip method=5 ! videorate ! ffmpegcolorspace ! \
  video/x-raw-yuv,width=800,height=600,framerate=\(fraction\)30/1 \
   x264enc pass=quant ! avimux ! filesink location=output.avi

The final video will be saved in output.avi. You can check the video output here :

If you like my work, tip me!

Designing Configuration and Settings UI for Kivy

From 3 weeks now, i’m working on packaging kivy application, to create a installer/bundle/deb of a Kivy application. The reason is simple: as soon as you are doing an application, the user should not care about installing Kivy itself. In the same time, i’ve work on other projects that require to have their own configuration. From a long time, we always wanted to have some in-app settings for configure Kivy. Even Android have a “settings” button, we wanted to use it. :)

This is now possible.

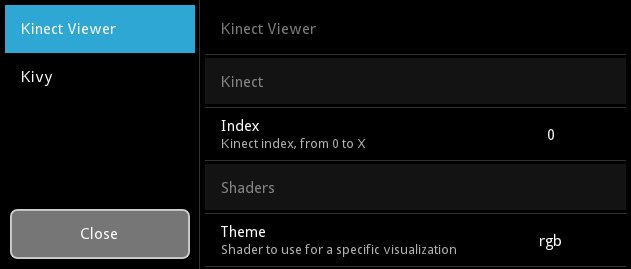
Yes, it look like the honeycomb settings panel. Kind of. Well.

The configuration is automatically handled by the App class, and you can put your own token on it. The settings UI (that you’re seeing on the screen) is created from a JSON definitions. You can press F1 or the settings key on android to bring the settings panel, hook the on_config_change to know when a configuration token is changed from the settings ui, etc.

This is available in master, and will be published on next 1.0.7 version. If you are interested, please read and give feedback about the App documentation and the Settings documentation.

If you like my work, tip me!

NPOT textures support in OpenGL

If you already done OpenGL development, you should be aware of POT (Power of two) texture. Because of very old conventions, the texture size must be a power of two size. Not necessarily the same for width and height though : 256×256 is valid as 128×512.

The usual thing to do when you want to load an NPOT texture (like 23×61) is to:

  • take his closed POT size: 32×64
  • depending of the book you’re reading: blit/strech the 23×61 to the 32×64 texture
  • OR blit without stretch, and adjust texture coordinate (this is what kivy does right now.)

The downside part of this approach is that you’re lost a part of memory. Bad.

While ago, i remember to found the Rectangle texture support from NVidia. Aaah, finally, is it what we was waiting from a long time ? Erm, no. Their implementation have lot of downsides:

  • The usage of a specific texture target: GL_TEXTURE_RECTANGLE_NV
  • No mipmap support
  • The texture coordinates are not normalized from 0-1… but from 0-width/height of the image
  • Some wrap mode are not supported (GL_REPEAT for eg.)

But today… i discover that most graphics card are supporting rectangle texture. If the extension GL_ARB_texture_non_power_of_two (OES_texture_npot for OpenGL ES platform), you can finally ensure that loading NPOT texture will… just work as expected :

  • You can still use GL_TEXTURE_2D
  • Mipmapping are supported
  • Texture coordinates are from 0-1
  • All wrap mode are supported

A little note here, in OpenGL ES 2, they have a native support for NPOT texture, but with somes limitations related to mipmapping.

If you want to just load NPOT texture safely without using rectangle texture, just check the availability of theses extensions :

extensions = glGetString(GL_EXTENSIONS).split()
npot_support = ('OES_texture_npot' in extensions or \
                'GL_ARB_texture_non_power_of_two' in extensions)

Using microphone peak as input

I’m currently on a project that involve disabled peoples, audio and kinect. Theses boys and girls are doing lot of loud sounds, so the idea is to use their sound as a trigger. We can use gstreamer to make that work quite easily, cause it have everything we need: a audio source, and level calculator.

import pygst
pygst.require('0.10')
import gst, gobject
gobject.threads_init()
 
pipeline = gst.parse_launch(
    'pulsesrc ! audioconvert ! '
    'audio/x-raw-int,channels=2,rate=44100,endianness=1234,'
    'width=32,depth=32,signed=(bool)True !'
    'level name=level interval=10000000 !'
    'fakesink')
 
level = pipeline.get_by_name('level')
bus = pipeline.get_bus()
bus.add_signal_watch()
 
def show_peak(bus, message):
    # filter only on level messages
    if message.src is not level:
        return
    if not message.structure.has_key('peak'):
        return
    # read peak
    print 'peak', message.structure['peak'][0]
 
# connect the callback
bus.connect('message', show_peak)
 
# start the pipeline
pipeline.set_state(gst.STATE_PLAYING)
 
ctx = gobject.gobject.main_context_default()
while ctx:
    ctx.iteration()

The output could be something like this :

peak -35.2370719856
peak -35.0252114393
peak -10.8591229158
peak -4.6007387433
peak -4.85102463679
peak -6.45292575653
peak -6.83102903668
peak -7.39486319074
peak -13.9852340247
peak -17.423901433
peak -35.0852178272
peak -35.8725208237

Next, we can use that information to record their sound, and use it on some scenario. So, instead of use the fakesink, we can use appsink. This module allow you to read the buffer pushed by the previous module. So we can put theses buffers into a list, and use them when needed :)

The state machine will handle the 3 phases :

  1. Wait for a peak > -30db
  2. Recording the sound, stop when the peak is < -32db
  3. Replay the last sound

Note: The -30 / -32 are taken from my tests. If you have more noise, you need to adjust theses triggers.

And here is the final example:

import pygst
pygst.require('0.10')
import gst, gobject
gobject.threads_init()
 
pipeline_play = None
pipeline = gst.parse_launch(
    'pulsesrc ! audioconvert ! '
    'audio/x-raw-int,channels=2,rate=44100,endianness=1234,'
    'width=32,depth=32,signed=(bool)True !'
    'level name=level interval=10000000 !'
    'appsink name=app emit-signals=True')
 
state = 'wait'
peak = -99
buffers = []
level = pipeline.get_by_name('level')
app = pipeline.get_by_name('app')
bus = pipeline.get_bus()
bus.add_signal_watch()
 
def show_peak(bus, message):
    global peak
    # filter only on level messages
    if message.src is not level:
        return
    if not message.structure.has_key('peak'):
        return
    # read peak
    peak = message.structure['peak'][0]
 
def enqueue_audio_buffer(app):
    buffers.append(str(app.emit('pull-buffer')))
 
def play_sample(sample):
    global pipeline_play
    with open('audio.dat', 'wb') as fd:
        fd.write(sample)
    if pipeline_play is None:
        pipeline_play = gst.parse_launch(
            'filesrc location=audio.dat !'
            'audio/x-raw-int,channels=2,rate=44100,endianness=1234,'
            'width=32,depth=32,signed=(bool)True !'
            'audioamplify amplification=2 ! autoaudiosink')
    pipeline_play.set_state(gst.STATE_NULL)
    pipeline_play.set_state(gst.STATE_PLAYING)
 
# connect the callback
bus.connect('message', show_peak)
app.connect('new-buffer', enqueue_audio_buffer)
 
# start the pipeline
pipeline.set_state(gst.STATE_PLAYING)
 
# main loop
ctx = gobject.gobject.main_context_default()
while ctx:
    ctx.iteration()
    print state, peak
 
    # wait for somebody to make a sound
    if state == 'wait':
        if peak > -30:
            state = 'record'
            continue
        # discard any buffer
        buffers = []
 
    # record the current audio, until the peak is going down
    elif state == 'record':
        if peak < -32:
            state = 'replay'
            continue
 
    # replay last sound
    elif state == 'replay':
        play_sample(''.join(buffers))
        state = 'wait'

Usage: Just make a sound… and it will replay just after.

Kivy on Android, part 2

Hi guys,

Look like people are following my blog and waiting for android version of Kivy.
We have a launcher that you can already use. Check the :

Maybe during the next release, or a little bit after, i’ll release a software to create an Android package of a Kivy application. The code is already on launchpad, but it’s still a work in progress. As soon as i have finished, i’ll publish it on kivy-dev mailing list. If you didn’t subscribe yet, do it now ! :)

More to come by the end of that week… !

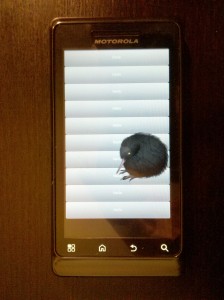
Kivy (next PyMT) on Android, step 1 done !

Tonight is a wonderful night.

I know that i didn't announce Kivy officially yet, but i'll do it in another blog post very soon. You just need to know that Kivy is the next PyMT version. From 2 years ago with thomas, we have regulary doubts and reflections about using Python for PyMT. And i've started to look more at the future, and i was deeply convince that for our sake, we must be able to run on a Webbrowser. The goal is simple: same code for every platform, at least what we use every day: Linux / Windows / Macosx / Android / iOS.

Android and iOS are new OS, and we was thinking that except running in webbrowser, we will be never able to run on it. And we have started to target a futur with fewer dependencies, OpenGL ES 2.0 compatible, and so on. This vision have been named Kivy. Theses last days, i've removed numpy and pyopengl dependencies. Pygame is the only library required for running an application with widgets. (minimal don't mean full featured).

And i've started to look at the android platform, since Tom from Renpy library have deliver a pygame subset for android. He just made an awesome work. My part was just to understand how it work, and get Kivy compilation done.

For now, here is what i've got :

Ok, but what i got exactly ?

  • Python/Pygame running from renpytom project
  • Failed attempt to use numpy on android
  • Kivy adapation for android (opengl debug mode, removing numpy and pyopengl, link on opengl es 2.0...)
  • Pygame change to create OpenGL ES 2.0
  • Various patch on the build system

And here is my step 2 :

  • Send to upstream all the patch on the build system
  • Resolve symbol conflict when 2 compiled module have the same name (kivy.event and pygame.event... nice naming.)
  • Add a way of detecting Android platform from python
  • Add multitouch support to pygame and/or kivy
  • Add android sleep/wakeup in kivy
  • Write documentation about how to compile a kivy application on android

For now, sleep time ! Enjoy.