Kivy at EuroPython – Lightning explanation


For all the guys that was interested about Kivy lightning talk at EuroPython 2011, due to some incomprehension about what is Kivy, here is a lightning explanation to make it clear.

Kivy is a Python framework designed for creating of Natural Users Interfaces. The framework containing abstraction for loading image, video, audio. It have a complete new approach about input events, and widgets. For example, you can use lot of widgets at the _same_ time, something not really possible in classical framework (qt, gtk…): try to touch on a button while selecting something in a list. This is not only about multitouch for one user, but also for multi users. Kivy graphics engine is in OpenGL ES2, and all the widgets are using it.

If you write an application in top of Kivy, you can deploy it on Linux, MacOSX, Windows and Android. Without changing anything in your code. Because it’s in Python.

The presentation tool i’ve used is PreseMT. It have been made by Christopher and Me. And it’s an application built using Kivy. A version of this tool is already published on Android Market.
PreseMT have been written in one week, and use lot of Kivy features. But it’s still not finished, and we are missing lot of features, like the ability to export the presentation in a “good” format. We have plan to make an export in HTML5, that will support animation too.

Feel free to follow me on @mathieuvirbel !

Recording OpenGL output to H264 video

Apitrace is a tool for recording all the gl commands in a trace file. The trace file can be replay in later time, and they got a nice gui for checking all the gl call every frame, with introspection. They have a glretrace software that replay a trace file. We can use it to get the output of everyframe and push it in a gstreamer pipeline to make a video.

Why not using gtkRecordMyDesktop or other screen capture ? Sometime, the overhead of capturing and encoding video on live take too much CPU. And the application start to slow down. I didn’t see any slowdown using apitrace, and the trace file is very small compared to video output or raw video output.

So first, compile apitrace with stdout support:

$ git clone git://github.com/tito/apitrace.git
$ cd apitrace
$ git checkout snapshot-stdout
$ mkdir build
$ cd build
$ cmake ..
$ make

Take any opengl application, and make a trace file. The trace file will have the name of the binary. In my case, python is an alias to python2.7: the trace file will be python2.7.trace.

$ LD_PRELOAD=./glxtrace.so python ~/code/kivy/examples/demo/pictures/main.py
# replay for fun now
$ ./glretrace python2.7.trace

To be able to make a video from the trace file, you need to know the size of the window, and the initial framerate. Here, my example is running at 800x600, 60fps:

$ ./glretrace -sr python2.7-trace | \
 gst-launch fdsrc ! \
 videoparse width=800 height=600 format=rgbx framerate=60 ! \
 videoflip method=5 ! videorate ! ffmpegcolorspace ! \
 video/x-raw-yuv,width=800,height=600,framerate=\(fraction\)30/1 \
 x264enc pass=quant ! avimux ! filesink location=output.avi

The final video will be saved in output.avi. You can check the video output here :

▶ Watch the video on YouTube

Recording OpenGL output to H264 video

Apitrace is a tool for recording all the gl commands in a trace file. The trace file can be replay in later time, and they got a nice gui for checking all the gl call every frame, with introspection. They have a glretrace software that replay a trace file. We can use it to get the output of everyframe and push it in a gstreamer pipeline to make a video.

Why not using gtkRecordMyDesktop or other screen capture ? Sometime, the overhead of capturing and encoding video on live take too much CPU. And the application start to slow down. I didn’t see any slowdown using apitrace, and the trace file is very small compared to video output or raw video output.

So first, compile apitrace with stdout support:

$ git clone git://github.com/tito/apitrace.git
$ cd apitrace
$ git checkout snapshot-stdout
$ mkdir build
$ cd build
$ cmake ..
$ make

Take any opengl application, and make a trace file. The trace file will have the name of the binary. In my case, python is an alias to python2.7: the trace file will be python2.7.trace.

$ LD_PRELOAD=./glxtrace.so python ~/code/kivy/examples/demo/pictures/main.py
# replay for fun now
$ ./glretrace python2.7.trace

To be able to make a video from the trace file, you need to know the size of the window, and the initial framerate. Here, my example is running at 800×600, 60fps:

$ ./glretrace -sr python2.7-trace | \
  gst-launch fdsrc ! \
  videoparse width=800 height=600 format=rgbx framerate=60 ! \
  videoflip method=5 ! videorate ! ffmpegcolorspace ! \
  video/x-raw-yuv,width=800,height=600,framerate=\(fraction\)30/1 \
   x264enc pass=quant ! avimux ! filesink location=output.avi

The final video will be saved in output.avi. You can check the video output here :

If you like my work, tip me!

Designing Configuration and Settings UI for Kivy

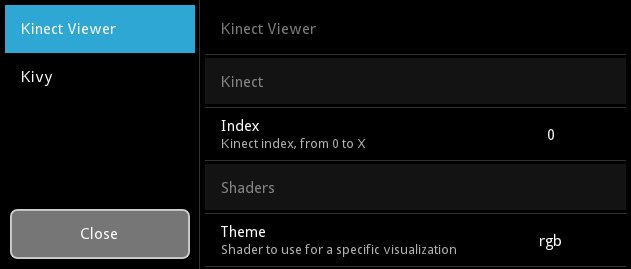
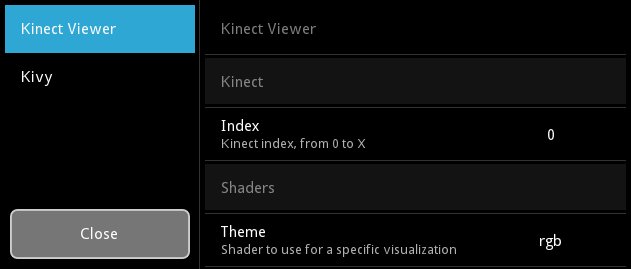
From 3 weeks now, i’m working on packaging kivy application, to create a installer/bundle/deb of a Kivy application. The reason is simple: as soon as you are doing an application, the user should not care about installing Kivy itself. In the same time, i’ve work on other projects that require to have their own configuration. From a long time, we always wanted to have some in-app settings for configure Kivy. Even Android have a “settings” button, we wanted to use it. :)

This is now possible.

Yes, it look like the honeycomb settings panel. Kind of. Well.

The configuration is automatically handled by the App class, and you can put your own token on it. The settings UI (that you’re seeing on the screen) is created from a JSON definitions. You can press F1 or the settings key on android to bring the settings panel, hook the on_config_change to know when a configuration token is changed from the settings ui, etc.

This is available in master, and will be published on next 1.0.7 version. If you are interested, please read and give feedback about the App documentation and the Settings documentation.

Designing Configuration and Settings UI for Kivy

From 3 weeks now, i’m working on packaging kivy application, to create a installer/bundle/deb of a Kivy application. The reason is simple: as soon as you are doing an application, the user should not care about installing Kivy itself. In the same time, i’ve work on other projects that require to have their own configuration. From a long time, we always wanted to have some in-app settings for configure Kivy. Even Android have a “settings” button, we wanted to use it. :)

This is now possible.

Yes, it look like the honeycomb settings panel. Kind of. Well.

The configuration is automatically handled by the App class, and you can put your own token on it. The settings UI (that you’re seeing on the screen) is created from a JSON definitions. You can press F1 or the settings key on android to bring the settings panel, hook the on_config_change to know when a configuration token is changed from the settings ui, etc.

This is available in master, and will be published on next 1.0.7 version. If you are interested, please read and give feedback about the App documentation and the Settings documentation.

If you like my work, tip me!

NPOT textures support in OpenGL

If you already done OpenGL development, you should be aware of POT (Power of two) texture. Because of very old conventions, the texture size must be a power of two size. Not necessarily the same for width and height though : 256x256 is valid as 128x512.

The usual thing to do when you want to load an NPOT texture (like 23x61) is to:

  • take his closed POT size: 32x64
  • depending of the book you’re reading: blit/strech the 23x61 to the 32x64 texture
  • OR blit without stretch, and adjust texture coordinate (this is what kivy does right now.)

The downside part of this approach is that you’re lost a part of memory. Bad.

While ago, i remember to found the Rectangle texture support from NVidia. Aaah, finally, is it what we was waiting from a long time ? Erm, no. Their implementation have lot of downsides:

  • The usage of a specific texture target: GL_TEXTURE_RECTANGLE_NV
  • No mipmap support
  • The texture coordinates are not normalized from 0-1… but from 0-width/height of the image
  • Some wrap mode are not supported (GL_REPEAT for eg.)

But today… i discover that most graphics card are supporting rectangle texture. If the extension GL_ARB_texture_non_power_of_two (OES_texture_npot for OpenGL ES platform), you can finally ensure that loading NPOT texture will… just work as expected :

  • You can still use GL_TEXTURE_2D
  • Mipmapping are supported
  • Texture coordinates are from 0-1
  • All wrap mode are supported

A little note here, in OpenGL ES 2, they have a native support for NPOT texture, but with somes limitations related to mipmapping.

If you want to just load NPOT texture safely without using rectangle texture, just check the availability of theses extensions :

extensions = glGetString(GL_EXTENSIONS).split()
npot_support = ('OES_texture_npot' in extensions or \
 'GL_ARB_texture_non_power_of_two' in extensions)

NPOT textures support in OpenGL

If you already done OpenGL development, you should be aware of POT (Power of two) texture. Because of very old conventions, the texture size must be a power of two size. Not necessarily the same for width and height though : 256×256 is valid as 128×512.

The usual thing to do when you want to load an NPOT texture (like 23×61) is to:

  • take his closed POT size: 32×64
  • depending of the book you’re reading: blit/strech the 23×61 to the 32×64 texture
  • OR blit without stretch, and adjust texture coordinate (this is what kivy does right now.)

The downside part of this approach is that you’re lost a part of memory. Bad.

While ago, i remember to found the Rectangle texture support from NVidia. Aaah, finally, is it what we was waiting from a long time ? Erm, no. Their implementation have lot of downsides:

  • The usage of a specific texture target: GL_TEXTURE_RECTANGLE_NV
  • No mipmap support
  • The texture coordinates are not normalized from 0-1… but from 0-width/height of the image
  • Some wrap mode are not supported (GL_REPEAT for eg.)

But today… i discover that most graphics card are supporting rectangle texture. If the extension GL_ARB_texture_non_power_of_two (OES_texture_npot for OpenGL ES platform), you can finally ensure that loading NPOT texture will… just work as expected :

  • You can still use GL_TEXTURE_2D
  • Mipmapping are supported
  • Texture coordinates are from 0-1
  • All wrap mode are supported

A little note here, in OpenGL ES 2, they have a native support for NPOT texture, but with somes limitations related to mipmapping.

If you want to just load NPOT texture safely without using rectangle texture, just check the availability of theses extensions :

extensions = glGetString(GL_EXTENSIONS).split()
npot_support = ('OES_texture_npot' in extensions or \
                'GL_ARB_texture_non_power_of_two' in extensions)

Kivy Window Management on X11

In the previous post we observed the kivy.core.window.Window object and discovered Window management from the Kivy API was quite limited. Since I am working on Linux, and that Linux conventionally use X11 as their window manager, I thought I'd take a look at the Python-Xlib module and see if we could control our Basic Application's geometry. And the good news is: it worked out fine :)

I've not looked into all details; working with X is new for me and I'm not familiar with conventions. Nevertheless, by peeking at some example code here and there on the net, I managed to get hold of our window and change its size.

First, you'll need Python Xlib, which you can get with:
sudo apt-get install python-xlib

Then make a module, which we call kivyXwm.py (for Kivy X Window Manager):
#!/usr/bin/env python
 
from Xlib.display import Display
from Xlib import X
 
def resize(title=str, height=int, width=int):
    TITLE = title
    HEIGHT = height
    WIDTH = width
   
    display = Display()
    root = display.screen().root
    windowIDs = root.get_full_property(display.intern_atom('_NET_CLIENT_LIST'), 
        X.AnyPropertyType).value
    for windowID in windowIDs:
        window = display.create_resource_object('window', windowID)
        title = window.get_wm_name()
        pid = window.get_full_property(display.intern_atom('_NET_WM_PID'), 
        X.AnyPropertyType)
        if TITLE in title:
            window.configure(width = WIDTH, height = HEIGHT)
            display.sync()

As I said, I am still a novice with X, but let me try to explain the big lines of the above code:
Line 9 & 10: we get the X display and the root window (which I understand is the main window, which is occupied by your desktop usually).
Line 11: get a list of all windows on the display. This list, however will only be known by their IDs, which is an int, so:
Line  12 to 16: we create an abstract object representing each window and find out if their title match our application's title.
Line 17 & 18: we change the height and width value of our window and we update the display.

Then we modify our Basic Application code like so:
#!/usr/bin/env python

import kivy
kivy.require('1.0.6')

from kivy.app import App
from kivy.uix.button import Button
from kivy.logger import Logger
import kivyXwm

class CoolApp(App):
    icon = 'custom-kivy-icon.png'
    title = 'Basic Application'
   
    def build(self):
        return Button(text='Hello World')
   
    def on_start(self):
        kivyXwm.resize(self.title, 100, 100)
        Logger.info('App: I\'m alive!')
   
    def on_stop(self):
        Logger.critical('App: Aaaargh I\'m dying!')

if __name__ in ('__android__', '__main__'):
    CoolApp().run()


Now in spite of the default size of your Kivy application (defined in the config file at ~/.kivy/config.ini), we set a new size for the application of 100x100. It's not a pretty thing to do, as you can see, although it's fast, it's a two-step procedure: first, Kivy makes a 600x800 window, then X changes its size to 100x100. Truly, it's a job for the GUI to set the Window size property. But this control through Xlib is good for other stuff, like setting the window "always on top" or "skip taskbar" parameters.
Xlib is able to pick up the application window from its title. I am still a bit confused here as to why title is a class attribute and not an instance attribute, but you have to pass self.title in the kivyXwm.resize() function. This may not be the best solution, I wonder what happens if we'd run two instances of the same application with the same title. Windows have their own IDs, but I'm not sure as to how to find the window we want from the list of windows X displays. I'll have to look for an alternative. The bad news is: Python Xlib is poorly documented, there is not even a docstring in the module :(

But that's one small victory, let's see what  more can be done next time!

Kivy Window Management on X11

In the previous post we observed the kivy.core.window.Window object and discovered Window management from the Kivy API was quite limited. Since I am working on Linux, and that Linux conventionally use X11 as their window manager, I thought I'd take a look at the Python-Xlib module and see if we could control our Basic Application's geometry. And the good news is: it worked out fine :)

I've not looked into all details; working with X is new for me and I'm not familiar with conventions. Nevertheless, by peeking at some example code here and there on the net, I managed to get hold of our window and change its size.

First, you'll need Python Xlib, which you can get with:
sudo apt-get install python-xlib

Then make a module, which we call kivyXwm.py (for Kivy X Window Manager):
#!/usr/bin/env python
 
from Xlib.display import Display
from Xlib import X
 
def resize(title=str, height=int, width=int):
    TITLE = title
    HEIGHT = height
    WIDTH = width
   
    display = Display()
    root = display.screen().root
    windowIDs = root.get_full_property(display.intern_atom('_NET_CLIENT_LIST'), 
        X.AnyPropertyType).value
    for windowID in windowIDs:
        window = display.create_resource_object('window', windowID)
        title = window.get_wm_name()
        pid = window.get_full_property(display.intern_atom('_NET_WM_PID'), 
        X.AnyPropertyType)
        if TITLE in title:
            window.configure(width = WIDTH, height = HEIGHT)
            display.sync()

As I said, I am still a novice with X, but let me try to explain the big lines of the above code:
Line 9 & 10: we get the X display and the root window (which I understand is the main window, which is occupied by your desktop usually).
Line 11: get a list of all windows on the display. This list, however will only be known by their IDs, which is an int, so:
Line  12 to 16: we create an abstract object representing each window and find out if their title match our application's title.
Line 17 & 18: we change the height and width value of our window and we update the display.

Then we modify our Basic Application code like so:
#!/usr/bin/env python

import kivy
kivy.require('1.0.6')

from kivy.app import App
from kivy.uix.button import Button
from kivy.logger import Logger
import kivyXwm

class CoolApp(App):
    icon = 'custom-kivy-icon.png'
    title = 'Basic Application'
   
    def build(self):
        return Button(text='Hello World')
   
    def on_start(self):
        kivyXwm.resize(self.title, 100, 100)
        Logger.info('App: I\'m alive!')
   
    def on_stop(self):
        Logger.critical('App: Aaaargh I\'m dying!')

if __name__ in ('__android__', '__main__'):
    CoolApp().run()


Now in spite of the default size of your Kivy application (defined in the config file at ~/.kivy/config.ini), we set a new size for the application of 100x100. It's not a pretty thing to do, as you can see, although it's fast, it's a two-step procedure: first, Kivy makes a 600x800 window, then X changes its size to 100x100. Truly, it's a job for the GUI to set the Window size property. But this control through Xlib is good for other stuff, like setting the window "always on top" or "skip taskbar" parameters.
Xlib is able to pick up the application window from its title. I am still a bit confused here as to why title is a class attribute and not an instance attribute, but you have to pass self.title in the kivyXwm.resize() function. This may not be the best solution, I wonder what happens if we'd run two instances of the same application with the same title. Windows have their own IDs, but I'm not sure as to how to find the window we want from the list of windows X displays. I'll have to look for an alternative. The bad news is: Python Xlib is poorly documented, there is not even a docstring in the module :(

But that's one small victory, let's see what  more can be done next time!
Kivy: Tight Mac OS X Integration

I am very happy that I am allowed to participate in yet another Google Summer of Code in 2011. This will be my fourth consecutive and probably last GSoC – at least as a student. I am participating on behalf of the Kivy project for the second time now and my objective is to improve the integration of Kivy on Mac OS X. Let me explain what that means: In order for Kivy to function with its full set of features, which includes things like audio and video playback, window creation with OpenGL content, image display, spelling correction and more, we need to make use of some external software libraries that are dedicated to handle the respective tasks, such as video decoding, etc. Implementing a cross-platform video decoder for example is much work and beyond the scope of our project, which is why we use the work of other brilliant minds instead of reinventing the wheel. That said, there are a lot of different implementations for the kind of things we require. Since our goal is not to restrict the user to a certain set of those solutions, we abstract from those third party APIs and provide the necessary functionality through a common interface; both cross-platform and cross-API. This approach also enables us to more easily port Kivy to new platforms, such as Android, as we don’t have to modify the code that is using the abstractions, but just add a new implementation (which we refer to as a ‘provider’) for the new platform. Taking video as an example, we currently rely on gstreamer for the implementation. While gstreamer has proven to be a good choice on Linux (as it’s often included in Gnome based distributions anyway) it’s not an ideal choice from my point of view for other platforms like Mac OS X. This is because it adds additional packaging and maintenance overhead and also significantly increases the size of the Kivy distribution, as we have to compile and ship gstreamer with Kivy for the Mac (which is not easy anyway) because it doesn’t exist there by default. This is especially true because there is a native API to do the same things you’d use gstreamer for on the Mac. That API is always available on the Mac and using it would mean that we can still provide video playback support without shipping gstreamer. In fact, this is not only true for video, but for all of Kivy’s so-called ‘core providers’. Long story short, the goal of this GSoC is to use as many native Mac APIs (as is reasonable) instead of external libraries. Here is a list of Kivy’s core providers:
  • Window
  • OpenGL
  • Image
  • Text
  • Audio
  • Video
  • Spelling
  • Clipboard
  • Camera
OpenGL already works and so does Spelling because I had already taken care of those previously. The first things I tackled during this GSoC were the window and image providers. Obviously you need a window to display the other things and have some feedback while developing, so this was a pretty obvious starting point. The original plan was to base the new window provider on Cocoa’s APIs directly, but while looking into that Mathieu pointed out that it might be preferable at the start to base it on the development version of SDL instead (which is also what pygame uses) as they already have this abstraction for every platform under the sun, so other platforms might benefit as well. Also, SDL is pretty easy to compile and package. So after some hacking, what do we have right now? There is a working SDL window provider. You can use it to open a Window and display OpenGL content. Still missing is handling of certain SDL events such as proper mouse/touch integration. Wile you can already draw a line with it, it’s not finished the way it should be yet. That is a TODO item. Next up was the image provider. Why? Simply because Kivy loads a default texture for use in its GL operations, so we figured instead of patching that out temporarily I might as well implement the image provider directly. So what we have right now is a working image provider based on CoreGraphics that should be able to handle all image formats that the CG APIs natively handle. There are only two things missing. Firstly it doesn’t seem to be handling alpha channels properly yet and secondly it currently reports a fake list of supported formats. These are TODO items. After finishing what I pointed out before, next up would be text and video providers. Starting tomorrow (May 30th) I will be in the US for a couple of days to visit the university where I’ll hopefully be doing my Master’s thesis. Unfortunately I had to sign a form that I will not engage in any GSoC related coding activities while I am in the US (you have to do that if you’re non-US based), so my next report will have to be a little delayed. This is what it currently looks like with the pictures example: Kivy on OS X via SDL and CoreGraphics The code is available here and right now very much work in progress.